Seeded Dinner Rolls

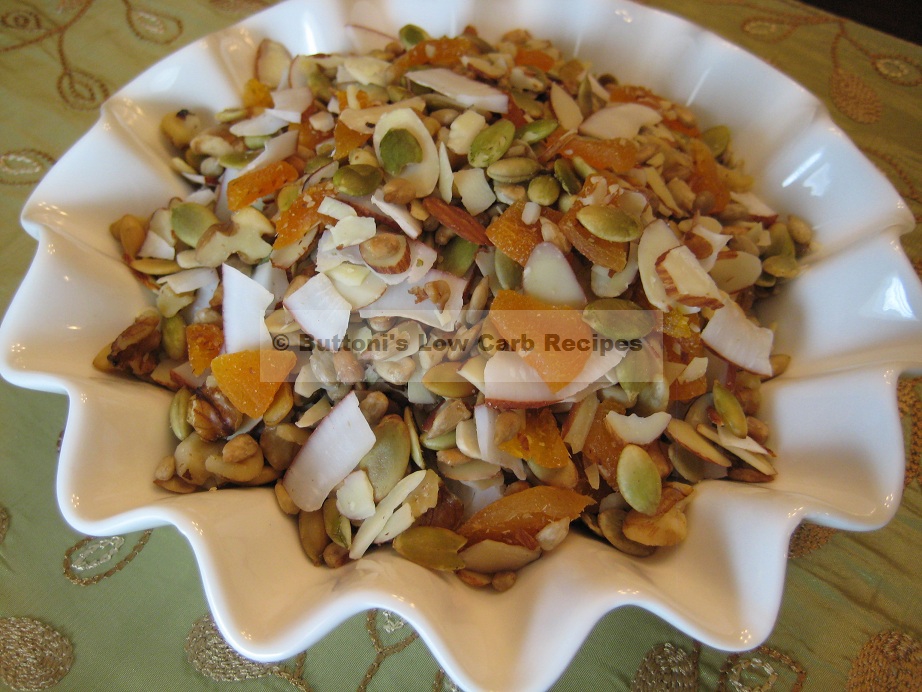
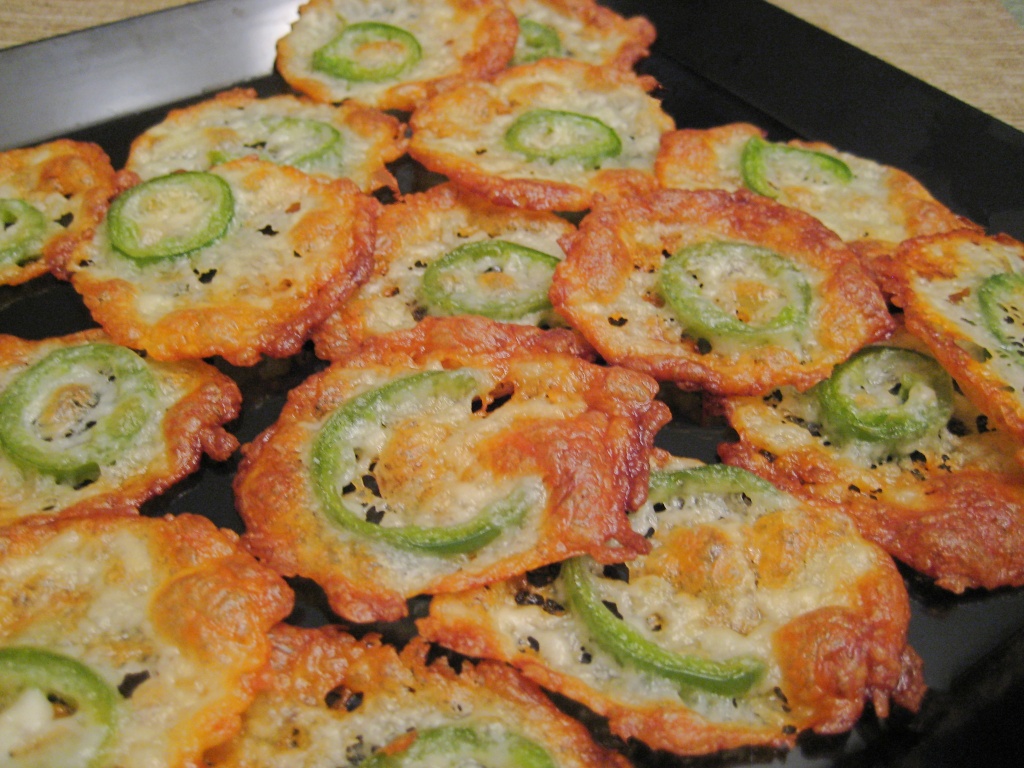
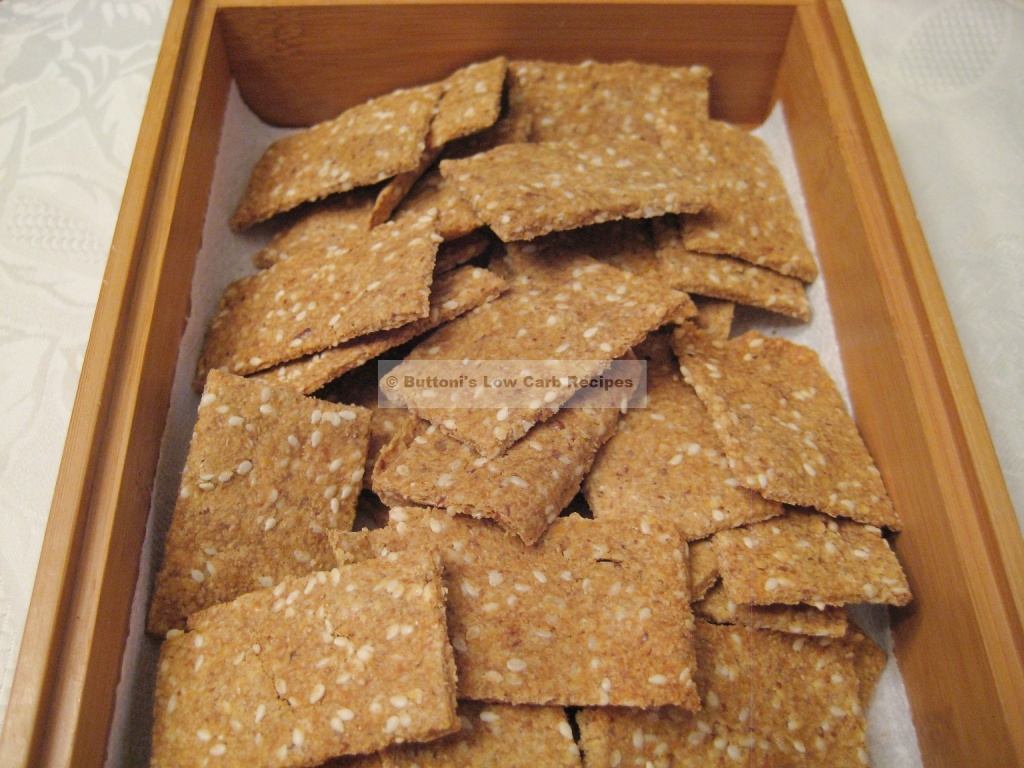
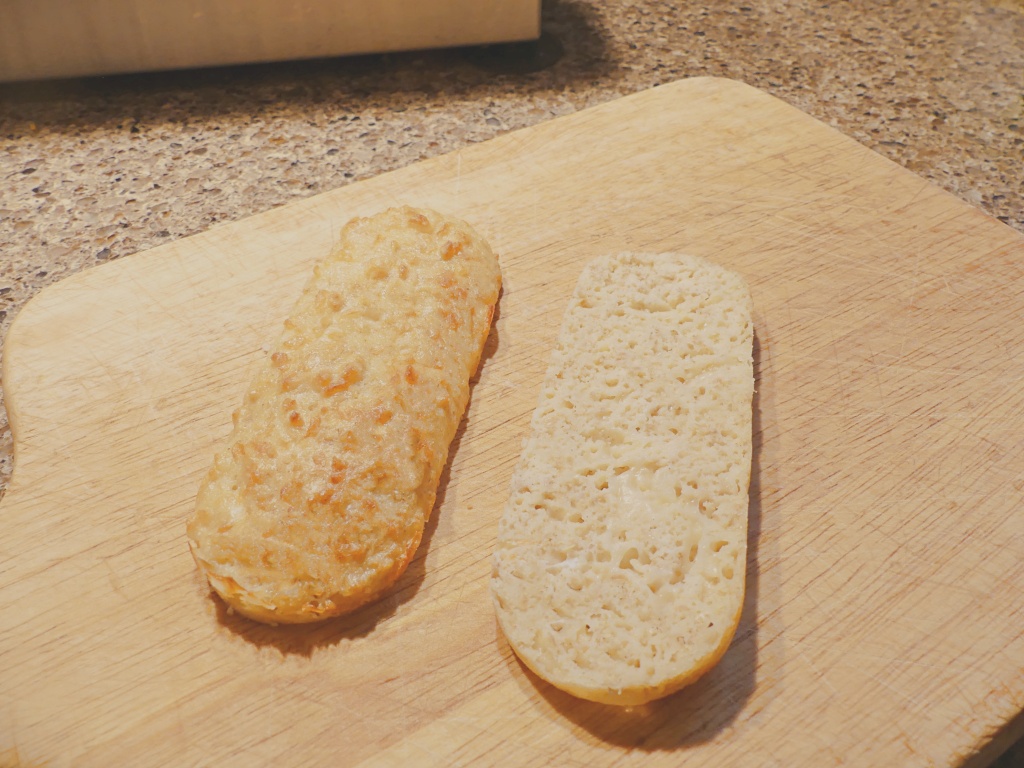
These delicious rolls are made with my Peggy’s Sliced Bread batter.  I simply sprinkled on a topping of my seed/spice mixture and chose a square muffin pan.    I topped mine with my 8-Seed version of Victoria Gourmet’s 7-Seed Crust spice blend:  http://www.vgourmet.com/7-Seed-Crust/p/VIC-00143&c=VictoriaGourmet@SeasoningBlends plus a few nigella seeds.  Sometimes I even add a few sunflower seeds on top if I have some on hand, just because I love them on breads & crackers. 

For perspective on rise, the wells in my non-stick pan are 3/4″ deep, but rise is minimal, as with so many low-carb breads.  I don’t like to use paper liners with high-egg content breads as they just won’t get that tasty brown bottom crust when you do.  Therefore I have to gently coax these out of the pan with the help of a knife tip after a bit of cooling, to prevent tearing up the bottoms.  Alternately, you could just drop these by heaping spoonsful (20 mounds) onto a non-stick baking sheet to achieve a biscuit appearance, as the inside texture is very similar to a biscuit.  These are not suitable until the grains rung of OWL due to the flour products in the Carbquick.  Even on the Victoria Gourmet website, I was unable to get nutritional info for the spice blend I used, so I calculated 1 gram of each the higher carb seeds listed in the ingredients on my bottle.  Don’t fret about the topping, as you’re getting few carbs there, considering you divide that mix into 20 portions.

These would also make lovely little finger sandwiches for parties with your favorite meat fillings!  I just made the best mini-BLT’s for my lunch with two of these. Lots of possibilities!

INGREDIENTS: 

8 oz. cream cheese, softened

4 large eggs, beaten

1 c. Jennifer Eloff’s Splendid Gluten-Free Bake Mix:  http://low-carb-news.blogspot.com/2011/04/im-very-excited-to-unveil-my-splendid.html

½ c. Carbquik bake mix (substitute ½ c. more Jennifer’s mix for gluten-free version)

½ tsp. baking soda

½ tsp. baking powder

¼ tsp. salt

1 T. seed/spice mix of your choosing (I use my 8-Seed Spice Blend)

DIRECTIONS:  Preheat oven to 350º.  Oil the cups of a non-stick square or round muffin pan.  Soften cream cheese in medium bowl and beat the eggs in until fairly smooth.  Add in all dry ingredients and stir until well blended.  Using a 2T. measuring cup, dip batter (rounded in the cup) into the muffin cups.  Batter is real thick, a bit sticky,  and you will have to scoop the batter out with your finger.  There should be enough batter for about 20 rolls and nutritional stats below are calculated on that number.  I took a round butter knife and tried to spread batter evenly into the cups.  Pop into 350º oven and bake about 20-22 minutes.   Check at 20 since ovens vary.  You don’t want to overly brown these or they will dry out.  Remove and cool a bit before gently coaxing them out of the pan with the help of a knife.  If the first one tears up a bit on the bottom, wait a little longer before removing the rest.

NUTRITIONAL INFO:  Makes 20 rolls, each contains:

86.75 cals, 7.59g fat, 3.68g carbs, 1.96g fiber, 1.72g NET CARBS, 5.37g protein, 141 mg sodium

BBQ Crack Cabbage with Ham

I found a small package of grilled pork slices in my freezer this morning I need to use up.  Since I have cooked this recipe numerous times now and my husband and I just LOVE it, it’s what’s for dinner tonight!  It’s so simple to make you’ll want to try this some time.  The mystery added ingredient, to what is basically the Crack Slaw recipe, makes all the difference in the world!  The BBQ sauce is the KEY INGREDIENT, so don’t omit that.  The flavor impact is astounding.   Without the sauce, it’s pretty much just an ordinary Crack Slaw in my opinion.  Carb count is a little high on this dish, but it is all in the healthy vegetables in it.  This recipe provides your daily requirements for Vitamins B6, C, iron, manganese, niacin, phosphorous and thiamin.  So the carbs are well worth it in nutrition alone!

This recipe is suitable for all phases of Atkins and most Keto programs.  Paleo/Primal Blueprint folks must use a plan-acceptable BBQ sauce.

INGREDIENTS:

3 T. bacon grease

8 oz. cooked cured ham, cut in small strips

2 oz. red bell pepper, cut in small strips

1 leek (12 oz.), washed, sliced ½” (or 1 lg. yellow onion)

12 oz. green cabbage, cut in ½” stir-fry slices

¼ c. low-carb BBQ sauce (I use G.Hughes, thinned with 1 T. each vinegar & water)

Dash of coarse black pepper

VARIATIONS:  Instead of ham, use thinly-sliced smoked sausage, leftover grilled pork meat, breakfast sausage mini-meatballs, or leftover BBQ brisket.  Brown all meats first in the skillet as was done with ham in the directions.

DIRECTIONS:  In a large non-stick wok or skillet, melt the bacon grease over high heat.  Add cut-up ham (or leftover grilled BBQ meat) and stir-fry to caramelize and lightly brown it for about 3 minutes.  Add the red bell pepper next and sauté until just barely starts to soften.  Add leeks and stir-fry until it just begins to go limp (about 4-5 minutes).   Add the cut-up cabbage and cook all together just until cabbage begins to soften.  Drizzle the water/vinegar- diluted BBQ sauce over the top and turn off heat.  Stir to mix the sauce to coat all ingredients with its smoky, sweet goodness.  Sprinkle top of mixture with a quality coarse black pepper.  At this juncture, you have two choices.  You can either serve the dish at once if you like your cabbage to still be a bit crunchy.  Or you can pop it into a 350º oven for 15-20 minutes for flavors to develop further and for veggies to get a bit softer.  Your call.

NUTRITIONAL INFO:  Made with leek rather than yellow onion, makes 5 servings, each contains:

199 cals, 11.72g fat, 12.02g carbs, 2.78g fiber, 9.24g NET CARBS (only 7.5g NET CARBS using yellow onion), 11.78g protein, 768 mg sodium

Jicama Cinnamon Chips

My husband went to the grocery store today and came home with a jicama.  This is one of my favorite ways to have jicama.  I love these for an easy dessert, for breakfast or for a late night snack.  They are very filling and taste a lot like baked apples!  These things satisfied my sweet tooth during Atkins Induction Phase when I craved something sweet.  This recipe is suitable for Keto, Paleo and Primal diets.

INGREDIENTS:

3 oz. jicama, peeled & sliced less than ¼” thick

2 T. melted butter

4-5 drops liquid stevia or liquid Splenda (or your preferred sweetener)

½ tsp. cinnamon

DIRECTIONS:  Preheat oven to 350º.  In sheet pan, melt butter.  Stir in cinnamon and liquid Splenda.  Slice jicama about 1/8″ thick (1/4″ if you like them crunchier) and place each slice into butter/cinnamon mixture.  Turn over so both sides are coated well.  Bake at 350º for about 20 minutes until begin to soften.  Serve warm!

VARIATION:   I have made this in a skillet using peeled chayote squash and a bit more butter.  Then I pop the skillet into the oven to finish off.  But I didn’t invent that wheel.  You can find that recipe over on Linda Genaw’s website:  http://genaw.com/lowcarb/fried_apples.html.  

NUTRITIONAL INFO: Serves 1 person.  Entire recipe contains:

239 cals, 23.1g fat, 8.4g carbs, 4.8g fiber, 3.6g NET CARBS, 0.9g protein, 6.8 mg. sodium


Beer-Braised Beef Shanks with Leeks

BeerBraisedShankswithleeks

The farmer that lease’s our pasture down on our cabin property gave us some beef shanks off the last Brangus he took to butcher.   I like to braise shanks with a little beer (low-carb, of course) or wine.  This is one of my all-time favorite braised beef recipes and ever so simple.  Cooks itself really, after searing the meat.   This dish is equally good made with large pieces of chuck roast or with beef short ribs, if you can’t get shank.  The carbs are coming from the leeks but they are really good with this meat.  This dish is only Induction friendly if you omit the beer. I served mine with buttered, steamed carrots and my Seeded Dinner Rolls . My husband likes his leeks stewed to “death”, as they appear in the photo.  But I would recommend if you like yours less “dead” (as do I), wait to add them to the pot after the meat has simmered for the first hour hour.   I thicken my broth with xanthan gum, but you can use whatever thickener is acceptable for your eating plan.

INGREDIENTS:

2½ lbs. lean, cross-cut beef shanks (or chunks of beef chuck/shoulder)

1 T. coconut or olive oil

2 oz. yellow onion, sliced

3 cloves garlic, minced

1 leek, cleaned and chopped into 2″ pieces

7 oz. large mushrooms, wiped clean

12 oz. low-carb beer (Michelob Ultra is low-carb)

1/4 tsp. ground thyme

1½ c. rich, homemade beef broth

about 1 c. water

thickener of your choice

VARIATION:  Use 1 c. white or rose wine instead of the beer

DIRECTIONS:   Cut root tip and top 1″of green part off the leek.  Slice it lengthwise and wash carefully with water between layers to get all “hiding” dirt out.  Cut into 2″ pieces and set aside.  Wipe mushrooms clean with a dry cloth, cut huge ones in half, leave others whole.  Set aside.    Heat a large dutch oven or stew pot until nearly smoking and add coconut oil.  Sear the pieces of meat on high flame until they are well browned on each side.  Add yellow onion, garlic, broth, beer, water to cover meat, thyme, salt and pepper.  Cover and lower heat to  slow simmer.  Simmer 1 hour.   Add mushrooms and leeks, lightly stirring them into the broth.  Cover again and simmer for about 30 more minutes or until meat is very tender.  Serve with your favorite low-carb bread or dinner rolls and a salad or another vegetable if you prefer.  ENJOY!

NUTRITIONAL INFO:  Makes 4 servings, each contains: (I have calculated the stats below assuming you consume an entire 1/4 of  the thickened broth, which is probably unlikely.  Actual consumed net carbs on the broth might be less than the 6.22 g. shown below.  But the actual consumed would be difficult to calculate any other way than I have shown at 1/4 the broth, 1/4 of the meat and 1/4 of the veggies.)

310 cals, 10.4g fat, 7.55g carbs, 1.33g fiber, 6.22g NET CARBS, 40.2g protein, 450 mg sodium

Strawberry Chocolate Torte

I’m not a big sweets eater, as many of my readers and forum acquaintances know by now.  But my husband is, so I fix him low-carb treats for special occasions otherwise he WILL go buy the awful flour/sugar laden versions at the bakery.  This dessert I created for his Valentine’s Day treat some years back and thought I’d share it today since there’s never a bad time for a good chocolate cake.  

The basic chocolate cake batter in this recipe is actually not my recipe.  My inspirational recipe was posted by a wonderful cook on LowCarbFriends forums named Gwen, known there as “The Chicken Lady” as she lives on a farm.  This cake is a testimonial to her incredible cooking skills. I love this cake and have made it more than one time now.  I can’t say that about many low-carb chocolate cakes I’ve tried.   Despite it looking sinfully rich, it was very light.   I have made no changes to her original chocolate cake recipe.  🙂

I did bake my cake in ONE 9″ round cake (wax-paper lined) cake pan that is unusually deep (2½”) and the cake rose nearly to the top!  It would bake OK in two standard shallow 9″ cake pans also, but reduce the cooking time if you make that pan change.  You’ll have more trouble slicing it into 4 layers, and might prefer to just do a two-layer final cake instead of three.  Or you could bake the cake in a wax-paper lined stew pot/Dutch oven.  That has worked for me many a time.  This dessert is not suitable until the berries rung of the Atkins OWL carb reintroduction ladder.  Due to the artificial sweeteners and dairy, this dessert is not be suitable for Paleo-Primal followers without considerable modification.

VARIATION:  Substitute raspberries for the strawberries.

This cake is fairly carb pricey, but if you can’t afford the carbs, you could cut it into 12 pieces.  That’s a wee bit better.  This should be considered a very special occasion treat because it IS so carb pricey.  Be sure if substituting other than liquid sweeteners, to add in those carbs!

CHICKEN LADY’S CHOCOLATE CAKE INGREDIENTS: 

4 c. almond flour
liquid sweetener to equal 2 c. sugar
½ c. granular erythritol (or equivalent sweetener of choice to equal 1/3 cup of sugar)
4 pkts. stevia (or equivalent for 8 tsp. sugar)  
½ c. cup cocoa powder
2 t. baking powder
2 t. baking soda
½ t. salt
1 Tbsp. vanilla
1/3 c. butter or coconut oil, melted
4 eggs, beaten
1 c. sour cream

MY FROSTING & FILLING INGREDIENTS:

2½ c. heavy cream, whipped

1/16-1/8 tsp. glucomannan powder, dusted over cream as you whip it (optional, to help firm up)

14 oz. frozen whole strawberries, thawed and drained of juice, chopped

1 c. fresh strawberries, chopped or 1 c. more frozen berries (or use all fresh berries)

Sweetener of choice to taste

DIRECTIONS: Preheat oven to 350º.   Mix and beat the wet cake ingredients in a large mixing bowl.   If your almond flour isn’t room temperature, make it so and press out any lumps.  Measure and add in all dry ingredients to the bowl and stir well. Line your cake pan(s) with waxed paper or parchment.  Grease the sides of the pan(s) well.  Pour batter into pan spreading it evenly with a rubber spatula. Tap pan on counter to eliminate air pockets and pop into 350º oven.  Bake for about 60 minutes if using one, very deep pan like I did.  If using two 1″ x 9″ round cake pans, they will cook much faster, in about 25-30 minutes or so.   Toothpick test the center.  It should come out clean and dry when the the cake is done.  Completely cool before attempting to tip cake out onto a board to cut it into layers.  This cake can also be made in a rectangular 9 x 13″ pan, cut in half and each half then sliced laterally to form 4 layers (reserve 1 layer for another use as you only need 3 layers for this cake).  All sorts of possibilities with that cake size.

While cake is in the oven, make the frosting:  Whip the cream until thick.  Run the berries through a food processor (or chop coarsely) for a few seconds.  Fold the berries into the whipped cream. Dust the pinch of glucomannan powder over the mixture slowly, folding after each addition, until all of it has been incorporated.  Taste for sweetness and add your favorite sweetener to taste.  Chill frosting until cake is totally cool.

Next cut the cake layers:  I sliced the completely cooled cake very carefully with a long-bladed knife, using a piece of cardboard covered with foil to gently slide each layer onto to set aside while I filled/frosted the final creation.  This cake has a firm texture and is not as crumbly as some almond flour cakes.  All good, but you still need to be careful, as even firm cakes can break.

Place about 1¼ c. of the frosting on the bottom layer of the cake.  Spread evenly with a rubber spatula, going almost to the edges.  Place the second layer of cake gently on the top and press slightly.  Put another 1¼ c. frosting on this layer and spread it out evenly.  Place the top cake layer on the stack, press slightly and spread all remaining frosting on the top and sides. OPTIONAL GARNISH:  Decorate the top of your cake with fresh strawberry slices, a few strawberry leaves  or perhaps a sliced and “fanned out” single strawberry at the center.  Chill in the refrigerator with plastic wrap on top until ready to cut and serve.

This cake was simply DELICIOUS and I will definitely be making it again!   My thanks to The Chicken Lady for her wonderful chocolate cake recipe.  It truly made my Valentines treat a success!

CONFESSION TIME:  The reason I used both frozen and fresh berries in the topping is I only had one 14 oz. bag of the frozen diced unsweetened berries in my freezer.  I thought that would make enough frosting.  But 1½ c. cream and those berries didn’t make enough frosting to frost the sides of the cake!  So I had to whip up a little more frosting real quick with another cup of cream and berries, so the last batch of frosting had to be made with the few fresh berries I had on hand.

NUTRITIONAL INFO:   Makes 10 servings, using the sweeteners specified, each serving contains:

632 cals, 57.8 g fat, 20.4 g carbs, 7.05 g fiber, 13.35 g NET CARBS, 15.2 g protein, 521 mg sodium

Almond Butter Cookies

almond002

These tasty treats come out kind of chewy and are still like that after they cool off.  I got this base batter idea from the chocolate chip cookie recipe on the back of the Honeyvillegrain Blanched Almond flour bag.  I made some drastic changes to their basic dough, however.  They used all almond flour in their recipe and I’ve added some ingredients I find improve low-carb baked goods.  I’m very pleased with the chewy texture of these cookies and will likely use this cookie dough as a base dough for many variations in the future.  So far I have done variations with fresh cherry, pineapple and pecan, dried prune , currant-spice, pumpkin, and chia-chai .  All have been delicious.  If you’re tired of cake-y or dry/brittle cookies and are wanting a low carb cookie that is moist and chewy, this one you really need to try!  They really deliver!  They also freeze well and are even chewier when eaten right out of the freezer, if you’re into very chewy cookies!!  These are not suitable until the nuts and seeds rung of the Atkins Phase 2 OWL carb reintroduction ladder.

DO NOT SUBSTITUTE OTHER SWEETENERS FOR THE SUGAR-FREE HONEY IN THESE OR THEY WILL NOT COME OUT CHEWY!  I tried that already.  Real honey works, but will also jack up the carbs considerably!

INGREDIENTS:

2 c. almond flour

½ c. coconut flour

1 T. oat fiber (substitute gluten-free oat flour for gluten-free version)

1 tsp. glucomannan powder (konjac powder)

1/8 tsp. salt

½ tsp. baking soda

½ c. coconut oil (or softened butter)

2 T. almond butter

1 T. vanilla extract

½ c. granular Splenda

1 T. erythritol

1 egg, beaten

¼ c. sugar-free imitation honey (no substitutions, unless it’s REAL honey)

DIRECTIONS:  Preheat oven to 350º.  In a large mixing bowl stir the almond butter and oil together until smooth.  Beat in the egg, vanilla and imitation honey.    Measure in all dry ingredients on top and stir well to form a smooth dough.   If your dough seems very dry or stiff (coconut flours vary), add in ½ beaten egg. Roll dough into 1″ balls and place them onto parchment lined baking sheet.  Leave 1″ space between cookies.  Press balls down slightly flat and pop pan into preheated oven.  Top with chopped, sliced almonds if desired, but this really doesn’t impact flavor, just the look.  Bake for about 7 minutes.  Do not over brown these cookies or texture will be drier and less chewy.  Remove from oven and cool on the pan a few minutes before removing with a spatula.  These are delicate while hot but “firm up” nicely when they cool. Store in an airtight container.

NUTRITIONAL INFO:   Makes 28 cookies, each contains:

105.5 cals, 9.1g fat, 4.12g carbs, 2.07g fiber, 2.05g NET CARBS, 2g protein, 48.2 mg sodium

HOMEMADE IMITATION HONEY: If you really don’t feel like running to the store for ready-made sugar-free honey, but also don’t want to use all real honey because of the carbs, I have a homemade recipe you might want to try.  Boil for 2-3 minutes: ¼ c. erythritol, 2 T. + 1 tsp. real honey and 1 pkt. stevia (or Splenda).  Cool (thickens as it cools) and put in airtight jar.  Added note:  If it crystalizes over time, just soften in the microwave on DEFROST for 1  minute or plunge into a pot of slow simmering warm water a minute or so before stirring and using.

Air Fryer Whole Roasted Chicken

I finally got around to trying a whole, roasted chicken in my Power XL 7 qt. air fryer and we loved the results.   Haven’t tried it  on the Air Fryer setting on my new wall oven though.  I’m sure it will cook as well in the oven.  Must try that soon.   

The meat of the nearly 5# bird came out moist and cooked perfectly (even at the difficult hip joint).  My husband just loves chicken that is baked or roasted, so he was a fan for certain!  Also tried out my new Peggy’s Poultry Rub on it and that was a delicious choice!  I may add even more of the rub next time!  Yummy!  This recipe is suitable for all phases of Atkins and other keto diets, as well as for Paleo-Primal folks.

INGREDIENTS:

1 whole chicken (mine was 4.75 lbs)

1 t. olive oil

1 T. Peggy’s Poultry Rub (or seasoning of your choice)

DIRECTIONS:  Pat the chicken dry of any water/moisture with paper towels.  Rub olive oil all over the chicken getting all skin surfaces damp with oil.  You’ll want to wash and dry off your hands at this point.  Next sprinkle 1 tsp. of the seasoning bland over the top surfaces of the chicken.  Sprinkle 1 tsp. over the bottom surfaces of the chicken.  Invert chicken to expose the carcass opening and sprinkle the remaining spice blend as best you can inside, rubbing until it is distributed.  Although I did not do it this, next time I may make a slit into the lower leg quarter joints and rub a tad in that joint as well as a tad underneath the breast skin as I am able.

Preheat your air-fryer at 350º a few minutes (mine requires 4 min. preheat).  Open basket/drawer and place seasoned bird into the basket/drawer breast side down. Cook the bird for 30 minutes.  Then open drawer and using a heavy kitchen fork, turn the bird over, now breast up.  Cook for 20 minutes and open basket to (check leg quarter with a meat thermometer (165º internal is done).  Also check thickest part of breast.  If not to 165º yet, continue cooking another 5-10 minutes and check again.  My 4.75# bird took precisely 25 minutes on side two.  Cookers vary, so the rule of thumb with air fryers is CHECK YOUR FOOD OFTEN to avoid under cooking, or worse, over cooking and major disappointment.   Always remember that any air-fryer recipe is just a guideline and nothing more.  Cookers vary for any recipe cookbook for them to be always spot on……….even the manufacturer’s cookbook!  Food size and volume/weight impact any instructions and cooking times/temps.

ADDED NOTE:  I recommend soaking your basket in 1″ water while you enjoy your meal (for easier cleanup).  Also don’t forget when fully cooled, to wipe off (use a soapy sponge) the element at the top and back walls of cooker to get any grease splatters there.  If you don’t do that, the cooker is likely to smoke heavily at next use and you’ll think the machine is dying on you.  It just wasn’t thoroughly cleaned after roasting meat.

NUTRITIONAL INFO:  I can’t really provide that for you as I can’t know what pieces you eat, how large your bird is, nor how many pieces you will eat.  I certainly can’t know how much of the seasoning you will be ingesting on any particular piece.  Best calculation I can recommend for you is to take the stats for the piece/size of piece(s) of chicken you eat and add 1/8 tsp. of the spice blend for each piece you consume.  That said, this recipe is so low-carb…………I wouldn’t bother calculating anything but the meat itself that you consume.  One can get too anal about any diet in my opinion.  Just enjoy this delicious recipe and know that you are not breaking the carb bank doing so!

1 tsp. spice blend = 0.84g NET CARBS

Apricot Trail Mix

0023

I absolutely LOVE trail mix.  And such a healthy snack!  It has the added bonus of being very transportable, for hiking, biking, camping, or taking to the office in a little baggie.  This apricot-coconut mix was a Christmas favorite of a relative.  She always brought some to the holiday gatherings.  The pumpkin seeds are my addition to her recipe.  The stuff is so good I have to dip my ½ cup portion out and put the bag away, or I’ll just keep eating and eating it.  Wrapped prettily with a ribbon, this makes a lovely gift when going to parties or for the holidays.  Just place in a pretty clear glass container and affix a pretty bow on top!  This very nutritious dessert/snack is not suitable until the highest fruit rung of the Atkins OWL carb re-introduction ladder (pre-maintenance or maintenance).  This recipe is suitable for Paleo-Primal eaters.

VARIATION:  Substitute pieces of dried prunes (Delmonte has no added sugar) for the dried apricots. I also have a Cranberry Trail Mix recipe you might like.

INGREDIENTS:

5 oz. pumpkin seeds, hulled, roasted (unsalted)

5 oz. sunflower seeds, hulled, roasted (unsalted)

2 oz. walnuts (about 28 halves), coarsely chopped/broken up

6 oz. fresh coconut meat, slivered thinly

4 oz. sliced almonds

6 oz. dried apricots, no sugar added (I buy them at Sam’s)

DIRECTIONS:  Preheat oven to 200º and spread thinly sliced coconut onto a sheet pan. Dry for about 1½-2 hours, stirring occasionally.  Remove from oven before coconut begins to brown and cool.  You don’t really want to toast it for this recipe, just dry it out a bit.  In a large mixing bowl, toss all ingredients together.  Using kitchen shears, cut apricots into small pieces and add to the bowl.  Stir to mix well.  Store in a zipper plastic bag in your pantry.

NUTRITIONAL INFO:   Makes about 6 cups or twelve ½ cup servings.  Each ½ cup serving contains:

301.6 cals, 23.5g fat, 18g carbs, 5.3g fiber, 12.7g NET CARBS, 9.8g protein, 53.6 mg sodium

Blackberry Ice Cream

I created a delicious low-carb blackberry ice cream some time ago I think you’ll love!  Our tree trimmer doing a job for us today pointed out my wild blackberries were setting fruit (which I had not yet noticed), so I think I’ll make a batch with the bag of mixed berries in my freezer. 

I would start out with 1 cup berries and taste as you go.  They vary so much in tartness/sweetness it’s difficult to know how many to add to desserts.  The taste-as-you-go approach is safest when it comes to blackberries.  My husband ate two servings with the full 2 cups of berries, but I’ll have to back off next time, most likely.  He just loved this recipe!  He’s a real ice cream connoisseur, so I consider that compliment  🙂  This recipe is naturally not suitable until the berries rung of the Atkins Ongoing Weight Loss (OWL) phase of the program.  If you don’t have the blueberry or blackberry syrup, you could sub in DaVinci Vanilla or French Vanilla and just omit the vanilla extract.

INGREDIENTS:

1 c. blackberries, frozen, unsweetened (Do Not Defrost!)

1¼ c. heavy cream

1/8 tsp. vanilla

4 T. sugar-free blackberry or syrup

12-16 drops liquid Splenda (or your favorite sweetener to taste)

2 tsp. food grade glycerine (optional, but keeps it a bit softer)

¼ c. powdered erythritol  (or reduce granular to a powder in processor)

DIRECTIONS:  Place erythritol in bowl of food processor.   Add all remaining ingredients and pulse until berries are broken up and mixture is fairly smooth.  Scrape out into dishes for a soft serve gelato.  Freeze for 30 minutes for a firmer ice cream.  ENJOY!

NUTRITIONAL INFO:   Makes 4 servings, each contains:

282 calories, 27.7 g  fat, 8.25 g  carbs, 1.9 g  fiber, 6.35 g  NET CARBS, 1.98 g protein


Cranberry-Orange Ladyfingers

You are going to LOVE these!  They just get better and better each day that goes by.  They’re even gluten-free, if you leave out the oat fiber.  🙂  Hubby really liked these and he’s not really a fruit and nut man.  If you don’t have a Twinkie® baking pan, just make 12 small muffins, or bake in a round cake pan for cutting in wedges.  These are not suitable for Atkins Induction on several levels.  They are suitable for Phase 2 and above and Keto diets as well.

INGREDIENTS:

½ c. almond flour

¼ c. flax meal (I use 50:50 gold and dark)

¼ c. plain whey protein powder

1 tsp. baking powder

1 T. oat fiber (omit for gluten free version)

1 c. shredded Monterrey Jack cheese

3 T. softened cream cheese

2 beaten large eggs

1 tsp. cider vinegar

1 T. heavy cream

2 T. fresh squeezed orange juice

1 T. warm tap water

1 tsp. yeast + 1 tsp. sugar dissolved in the warm water above (or 1 tsp. baking powder)

½ c. cranberries (homemade, dried, sugar-free)

½ c. slivered almonds

1 oz. orange peel

VARIATION:   Add a few chopped pecans.

DIRECTIONS:  Preheat oven to 350º.  Lightly oil a non-stick pan of your choice (discussed above) and set aside.

Measure out the first 6 (dry) ingredients into a medium mixing bowl.  In a separate small glass bowl, soften the cream cheese either at room temp or in your microwave on defrost.  Dissolve the yeast in the tablespoon of warm water in a saucer and add to the cream cheese.  Stir. Beat in the eggs well. Add the cider vinegar and cream.  Add the creamy mixture to the dry ingredients bowl and stir.

Trim off 1 oz. of orange peel from an orange.  You want to get as little white, bitter membrane as possible.  Cut into approximately 1″ pieces.  Place in food processor or blender.  Add cranberries and nuts to the bowl and pulse it all together about 10 times or so, to a coarse chop.   Add the fruit/nut mixture to the batter.  Stir. Finally squeeze/measure out the orange juice. Stir well one last time to incorporate all to achieve a uniform distribution of the fruit/nuts.

Dip into/onto your chosen pan, distributing the batter evenly into 12 muffin cups, 12 Twinkie® slots or a greased round cake pan.  Pop into 350º oven and bake for  20 minutes until lightly browned.  Allow to cool a bit before lifting with the assistance of a knife tip.  If making a round or loaf bread, bake around 35 minutes or until the center passes a dry toothpick test.  As with all low-carb baked goods, store in a bag in the refrigerator.

NUTRITIONAL INFO:  Makes 12 ladyfingers (or whatever shape you make), so 1/12 of the batch (1 portion) contains:

160 cals, 12.64g fat, 6.53g carbs, 2.71g fiber, 3.82g NET CARBS, 8.3 g protein, 266 mg sodium

Einkorn Blueberry Crumble

IMG_5056.JPG

When I don’t feel like the fuss of rolling out pastry but want fruit cobbler, I turn to fruit crumbles/crisps instead.  They just go together so much faster and are just about as good in my opinion.

For this crumble, I decided to open my first package of Swerve® sweetener and I was at a loss there.  It didn’t have any funny aftertaste sampled on my finger, nor in the final crumble dish that I could detect.  It is worthy of further experimenting in my opinion.  Just followed the info on the back of the packaging and it came out pretty close to my taste preference.  But honestly, it wasn’t quite sweet enough with 2 Tbsp. and I have therefore adjusted the recipe below for my future blueberry crumbles.   The final dessert came out quite tasty.

Blueberries are a little higher in carbs, so if you are still in the Induction phase of Atkins, use strawberries or raspberries instead for this recipe. To lower carbs further, omit the Einkorn flour totally and add in 2 more tablespoons of oat fiber or oat flour.  Be sure to recalculate when changing up ingredients however.  This recipe is not suitable until you have reached the nuts and berries level of Phase 2 Atkins.  It’s a little high carb for Keto diets.  This is not suitable for Primal-Paleo plans.

INGREDIENTS:

1½ c. fresh blueberries

3/4 c. Jennifer Eloff’s Splendid Gluten-Free Bake Mix (or other low-carb mix)

2 T. Einkorn flour

3 T. Swerve® sweetener (or equivalent sweetener to equal 3 T. sugar)

2 T. oat fiber

1 large egg

3 T. butter

DIRECTIONS:  Preheat oven to 350º.  Rub butter lightly on a 6″ square baking dish and set dish aside.  Put rest of the butter in a medium bowl.  Add all the dry ingredients on top of the butter.  Using a fork or pastry cutter, cut the butter into the dry mixture until it resembles coarse cornmeal.  Add the egg on top, beat it with a fork and slowly work it into a dough with the dry ingredients.  Using a fork or your fingers, crumble the dough evenly on top of the fruit.  Pop into preheated 350º oven and bake for about 20-23 minutes or until lightly browned on the top.  Slightly cool and enjoy warm.

NUTRITIONAL INFO:   Makes 4 servings, each contains:

240 cals, 18 g fat, 20.25 g carbs, 7.12 g fiber, 13.13 g NET CARBS, 13 g protein, 46 mg sodium

Peach Cobbler

This quick cobbler is made from canned, no-sugar-added peaches.  The crust is fashioned after the late KevinPa’s pie crust recipe once posted at the now defunct Low-Carb Friends forums, for those familiar with his baking prowess.  The pastry goes together real easily and you can be enjoying deliciously sweet cobbler in no time. 

I find that even though these peaches are artificially sweetened, they are not, like most canned fruit, sweet enough for me using them straight out of the can.  Therefore I add a packet of Splenda or Stevia to the fruit every time.  That hasn’t backfired on me YET.  The peaches may vary from can to can, brand to brand, so do a taste test on YOUR peaches to decide if you want to add that additional packet of sweetener (or more, or none).  You can substitute ¼ tsp. xanthan gum for the glucomannan powder as your thickening agent if you prefer. 

This recipe is not suitable until the advanced fruits rung of the OWL ladder of Atkins, in pre-maintenance.  

FILLING INGREDIENTS: 

2  14.5-oz. cans (no added sugar)

¼ tsp. cinnamon

Pinch nutmeg

½ tsp. glucomannan powder or xanthan gum

1 packet stevia or Splenda

2 T. unsalted butter (plus 1 T. more to grease the baking dish)

CRUST:

1 c. + 2 T. Carbalose flour 

6 T. resistant wheat starch 

½ c. + 1 T. butter

¼ tsp. salt

¼ c. ice cold water

DIRECTIONS:  Drain the liquid off just ONE of the cans of peaches (unless you like your cobbler super juicy.  You will want the juice from the second can in this recipe.  Grease the bottom and sides of an 8″x11″ baking dish with 1 T. softened butter.  Set aside.  In a medium mixing bowl, mix the peaches, peach juice, cinnamon, nutmeg, stevia and glucomannan powder (or xanthan gum).  Stir well and pour into buttered baking dish.  Dot with the 2 T. of butter.  Preheat your oven to 350º.

For the crust, in a mixing bowl, measure out the dry ingredients and add the butter.  Using a fork or pastry cutter, cut the shortening into the flour to break it up until the mixture resembles coarse cornmeal and the shortening is well-blended.  Slowly add the water, a little at a time and begin to stir into a solid dough.  Do not overwork the dough.  When you can form it into a single ball, it’s ready to roll.  I have two sheets of plastic I use for rolling out dough, but two pieces of any plastic wrap will do.  Moisten your counter top so the bottom piece remains still while you work.  Place dough on the bottom plastic and cover with a second sheet of plastic and roll the dough slightly larger than your baking dish. Lift the top piece of plastic off the dough gently and lifting up the bottom sheet of plastic, invert the dough onto your cobbler dish (folding the dough in half helps to lift it).  Trim off the excess dough about ¼-½” beyond the pan edges and crimp the edge inward so that it is entirely inside the dish.  Decorate the top with any surplus dough if you like.  I like to roll it again and cut out leaves and a representation of the fruit in the filling to dress up the tops of cobblers.  The color effect in the photo was achieved using a pastry brush dipped into watered down food coloring for added effect.  I sprinkled erythritol onto the cut-out peach as well.   Pop into preheated 350º oven for about 25 minutes or until lightly golden on top.  Cool slightly before attempting to dip up.

NUTRITIONAL INFO:  Makes 6 servings, each contains:

330 cals, 26.3g fat, 21.27g carbs, 13.17g fiber, 8.1g NET CARBS, 1.23g protein, 108 mg sodium

Best Banana Bread

Although I’ve said many times I’m not a BIG sweets eater, my husband is.  So I bake maybe one thing a week, enjoy one serving and he eats the rest.  That’s the way it was even before I started low-carbing.  This banana bread was one of the first sweets recipes I tried in 2009 when this journey began.  It came out so good, I still make it often.  I’m going to share those dessert recipes this week that I keep coming back to……favorites.  Although not always the spectacular, showy desserts, they are the ones I bake again and again.  That says something to me.  

To give credit where it is due, the basic batter that inspired this creation was a  recipe at Sugar Free Low Carb Recipes which no longer appears to exist when I Google it.   Hmm.   Anyway, I changed it up by adding vanilla, sweetener, baking powder and glucomannan powder.  I believe the smooth texture on my result is attributable to the glucomannan and makes this the perfect foundation for a wide variety of sweet bread possibilities.  

My first experiment with this batter was this banana bread recipe.  A slice only has 3.74 g net carbs using bananas!  The texture of this batter is amazing and the bread is ever so moist.  The basic batter made with only extract as flavoring has 1.08 g. net carbs (cut into 18 slices), so conceivably you could add any variety of fruits, dried fruits, nuts and flavorings for an endless variety of breakfast/dessert sweet breads.  Be sure to recalculate to include anything  you add and recalculate your new per-serving numbers, because the numbers below only reflect the basic batter and 2 mashed bananas.  This is suitable for Atkins OWL or above and I believe for Paleo-Primal adherence as well.

This recipe appears in Vol. 5 of Jennifer Eloff’s cookbook series Low Carbing Among Friends.  These books are a compilation of fantastic recipes from well-known low-carb cooking gurus on the internet.  Even Chef George Stella has participated in Jennifer’s cookbook venture. They make a wonderful addition to any low-carb cook’s library.  You can order copies at Amazon or here: http://amongfriends.us/order.php

INGREDIENTS:

1/3 c. coconut flour

2/3 c. almond flour

¼ tsp. sea salt

1 T. glucomannan powder

1 tsp. baking powder

Sweetener equivalent for ½ c. sugar 

1 stick unsalted butter, melted

3 T. coconut oil, melted

½ tsp. vanilla

8 eggs, beaten

2 mashed bananas

DIRECTIONS:  Preheat oven to 350º.  Grease a loaf pan with a bit of coconut oil or butter.  I use an odd-size loaf pan 4″x 2½x 10″ that allows me to get 18 smaller slices from my loaf.  Using a standard loaf pan, you may only get 9 slices and have to cut them in half to get the carb values shown below for each of my 18 slices.  Mix dry ingredients in a small mixing bowl. In a larger bowl, beat or whip all wet ingredients.  Add the dry items to the wet and whip with a whisk or electric mixer until smooth. Fold in your desired fruit, nuts or flavorings and stir well.    Spoon batter into greased pan, level with a spoon and bake at 350º for 40-45 minutes or until a toothpick stuck into center comes out dry/clean.  Cool a bit, slice into 18 servings (or 9 cut in halves) and serve warm.

NUTRITIONAL INFO:  Makes 18 servings, each contains: (2 bananas calculated in below, but no nuts)

141 calories, 12 g  fat, 5.61 g  carbs, 1.87 g  fiber, 3.74 g  NET CARBS, 4.24 g  protein, 90 mg sodium

Mayonado Dip

I usually keep the ingredients around the house for this favorite creation.  We call this one MAYONADO.  Nothing like coining your own words!  So I fixed this favorite to stand in as our salad to have with our Italian Bolognese Penne Bake tonight.   My husband brought home 6 avocados from the grocery store this afternoon that were discounted because they were already getting pretty ripe and one was past its prime.  I knew I needed to use that one tonight! 

I’ve combined mayonnaise with avocado for various purposes but never added Ranch® style flavoring to the mélange before this creation.  Man, is that ever good!  This dip is great on cucumber slices, but would be great for dipping cherry tomatoes, raw cauliflower, broccoli flowerets, sliced yellow squash, zucchini slices, carrot & celery sticks.  It would make a tasty dip for fried chicken strips or French fries, too.  The shawarma spice really adds something special and then the Ranch® seasoning………….well……takes it to a whole new level  This recipe is Atkins Induction friendly and suitable for all keto diets, Primal and Paleo.

INGREDIENTS:

1 small avocado, peeled and pitted

6 T. my homemade Shawarma mayonnaise

1 oz. yellow or white onion

Dash salt

few drops lemon or lime juice to prevent discoloring of the avocado

1 T. my Ranch Dressing Powder Blend

DIRECTIONS:  Peel and seed the avocado.  Place the flesh into a blender or processor with all the other ingredients.  Pulse until it it smooth.   Serve any of the above mentioned ways or get creative and think of new applications for this delightful concoction!

NUTRITIONAL INFO:   Makes about 10 T.  Each tablespoon contains:

90.4 cals, 9.2g fat, 4.29g carbs, 2.08g fiber, 2.21g NET CARBS, 0.62g protein, 19 mg sodium

Spicy Tuna Pâté

This is what got me through the first 2 weeks of my low-carb journey.  It’s very tasty and filling as well.  If you like things spicy, add even more spice than I indicate below.  A little Chipotle Tobasco® is also good in this spread.  This is very good on my Almond-Arrowroot Crackers or dipped up with celery or carrot sticks.  This dish is suitable for all phases of Atkins and other Keto diets.

INGREDIENTS:

3   2-oz. foil pouches oil-pack tuna (or 5 oz. can tuna, drained)

1 stick butter, unsalted, softened (4 oz.)

½ c. chopped parsley

1 tsp. fresh lime juice

¼ tsp. onion powder

1/8 tsp. cayenne pepper (more if you’re adventurous) or ¼ tsp. my Seafood Spice Blend

20 drops Chipotle Tobasco®

DIRECTIONS:   Combine all ingredients in the bowl of a food processor or blender and pulse until well mixed.  Garnish with a sprinkle more of the spice blend.  Serve with celery sticks or your favorite low-carb crackers.

NUTRITIONAL INFO:   Makes 4 servings.  ¼ batch contains:

286 calories, 26.3g fat, 1g carbs, 0.25g fiber, 0.75g NET CARBS, 12g protein, 149 mg sodium


Jack Snacks

I’l bet you folks just starting your low-carb diet wonder what YOU can snack on when the rest of the family is enjoying verboten foods.  Well this recipe, if you can call it a recipe, is one solution.  It’s suitable for Atkins Induction Phase, Keto diets and even Primal followers that eat occasional cheese.  Takes just minutes to make and bake!  After 14+ years running this blog, this is now my #1 recipe in popularity, having garnered well over 30,000,000 Facebook fans in 2015 alone.  That blows even my Lebanese Baked Chicken right out of the water. 🙂

If you seed the jalapeno, like I did, these are not all that hot (I don’t like real hot/spicy) for the spicy-adverse members of your household.  Leave the seeds in if you like to spice things up!  These are delicious and so low-cal/low-carb you could eat the entire batch if you were so inclined!  The hubs and I split this batch equally and we both loved these!  Now, to be quite honest, I’ve also just melted plain old pepper-jack cheese before, but these really are better for some reason.  Maybe the cheese is better; maybe the fresh pepper is just better.  All I know is these are much better than just melting pepperjack cheese!  🙂  Some have asked, and if you try to save some and reheat, you better really watch them closely, as they are inclined to burn when reheated.

INGREDIENTS:

1 cup shredded Monterrey Jack cheese

1 medium fresh jalapeno, sliced real thin

DIRECTIONS:  Preheat oven to 350º.  Place a sheet of parchment paper on a metal cookie sheet.  DO NOT use a silicone/silpat sheet, waxed paper or foil (unless it’s the special non-stick foil) to bake these or they will not cook properly.  Using a tablespoon, scoop up 1 T. of cheese and make a small pile on the parchment.  Press it slightly flat.  Repeat 15 more times. Place a slice of jalapeno on top of each pile.  Pop into 350º oven for about 10-12 minutes.  I would recommend browning them a wee bit more than shown in the photo for a firmer snack to serve at parties.  These are somewhat pliable if under browned. Allow them to completely cool and fully firm up before removing from the pan for best results. 🙂

NUTRITIONAL INFO:   Makes 16, each contains:

25.5 cals, 2.13 g fat, 0.10g carbs, 0.02g fiber, 0.08g NET CARBS, 1.63g protein, 60 mg sodium

Einkorn Sausage-Cheese Balls

Einkorn Sausage-Cheese Balls

As I have mentioned before, I’m not much of a snacks eater being on a one-meal-a-day regimen these days.  But when I do want a snack, it must be easily prepared with always-on-hand ingredients.  I’m not making a trip to the grocery store for my snacks, in other words.

This is an ever-popular party appetizer that never goes out of favor with your guests.  I have another Sausage Cheese Ball recipe on my website that rings in at only 1 net carb per ball but I like this one a bit better because it’s a little easier to put together.  It features my convenient homemade Einkorn Low-Carb Bake Mix (similar to Bisquick and Carbquik).  Even with the bake mix, these only have 1.76 net carbs per ball!  Not bad for the convenience of just 3 ingredients.   These are not suitable until the grains rung of the carb re-introduction ladder of Atkins Phase 2 OWL.  They are OK for Keto diets if you can fit them into your daily carb limits.

INGREDIENTS:

12 oz. breakfast sausage (I used my homemade breakfast sausage recipe)

1 c. shredded cheddar cheese

2 c. my Einkorn Bake Mix  (For gluten-free version, use Jennifer Eloff’s Gluten-Free Bake Mix or another GF mix of your choice)

DIRECTIONS:  Preheat oven to 350º. Mix the above ingredients in a medium bowl with your hands as you would a meatloaf mixture.  When thoroughly blended, form into 30 1″ balls and place on non-stick baking sheet or one lined with parchment or silicone sheet for ease of clean-up. Bake for 15-20 minutes until lightly browned.  Remove to paper towels to drain off any excess grease (mine had none actually).  Serve warm and ENJOY!

NUTRITIONAL INFO:  Makes 30  1″ balls, each sausage ball contains:

95 calories, 7.81 g  fat, 2.4 g  carbs, 0.64 g fiber, 1.76 g  NET CARBS, 4.82 g  protein, 81 mg sodium

Flax Crackers

My very first low-carb crackers.  Flax itself carries a sodium load and I rarely have to add salt to anything made with flax.  Texture on these is very good:  brittle, crunchy and crisp, especially the browner crackers that bake around the outer edges of the pan. But even those in the center of the pan were pretty crisp.

Each time I bake these, I try some new seasoning in them.  I think rosemary/onion may be my favorite.  Those are so good!  I’m very pleased these will stay crisp all week long just in a ziploc bag on the counter!  Re-toast them a bit in the oven if yours do not stay crisp.  

The ratio of flax and almond meal in these is JUST RIGHT!  This is my go-to cracker recipe when I’m really watching carbs tightly.  My non-low-carb husband likes these as well!  These crackers, excellent with cheese, butter, soup or whatever, are suitable most Keto plans, Paleo, Primal and of course, Atkins followers, once you reach the OWL (on-going Weight Loss) phase ‘nuts and seeds’ reintroduction level.

INGREDIENTS:

2 c. almond flour

1 c. flax meal (I use a 50:50 mixture of dark and golden)

2 tsp. onion powder

½ tsp. garlic powder

¼ tsp. salt

1 tsp. optional seasoning of your choice (see ideas below)

2 T. Extra Virgin Olive Oil

2 eggs, beaten (or 3 egg whites if you prefer a crisper cracker)

VARIATIONS:  Any herb(s) you like along with onion and garlic powder, any combination of grated cheeses with or without onion/garlic powders, rosemary and onion powder, coarse black pepper, Everything Bagel spice, sliced toasted shallots, just onion powder, just garlic powder, onion powder and cayenne, onion powder and smoky chipotle powder, Montreal Steak Seasoning, Cajun seasoning.  Get creative!    

DIRECTIONS:   Preheat oven to 350º.  Line a sided sheet pan with parchment.  Mine is 11½ x 17″.  Measure all dry ingredients into a large mixing bowl.  With a fork, beat in the two eggs and olive oil until the mixture is moist throughout.  Crumble the dough evenly over the parchment lined pan.  Then, using plastic gloves or baggies on your hands press the dough evenly into the pan, trying to achieve the same thickness throughout.  If you have a straight sided glass, you can even roll the dough out for a smoother surface, but this isn’t really necessary.  This will take you a few minutes. Score into 48 crackers (8 x 6) with a straight edge knife.  Pop into preheated oven and bake for 15-16 minutes.  They will brown around the edges of the pan faster and you may have to remove outer crackers as they bake.  Don’t over brown as flax products can get a burned taste real fast if over-browned.  Cool and break apart along score lines.  When thoroughly cool, store in ziploc plastic bag at room temperature in your pantry.

NUTRITIONAL INFO:   Makes 48 crackers, each cracker contains:

33.2 cals, 2.84 g fat, 1.37 g carbs, 0.93 g fiber, 0.44 g NET CARBS, 1.1 g protein, 15.2 mg sodium

Sesame Crackers

I have discovered I am so salt sensitive, I’m having to virtually eliminate the salt and greatly reduce the cheese and flax in my cracker recipes.  “Then along came my kidney stone in December and they told me to eliminate most of my salt intake and to stop using it when I cook.  Well, I cut way back on salt probably 30 years ago, so not really a problem for us.  These are not suitable for Atkins Induction Phase due to the sesame seeds.  Below is my lighter, blander version that I am going to use when I want sesame crackers from now on.   

Flax tends to burn (particularly around the edges) REAL FAST!!  So do watch these, as ovens vary.  I have to  remove the outer rows from the pan before baking time is up on these to avoid over-browning.  I used to crumble a chicken or beef bouillon cube into the dry ingredients of my crackers for a bit of a flavor twist, but I can’t do that anymore.  You might like to do so, however.  For a milder cracker, sometimes I reduce the flax meal 2-3 tablespoons and substitute in 2-3 T. almond meal, but only those on Phase 2 Atkins can do that and stay on program.  Both methods are good.  

INGREDIENTS:

1½ c. flax meal (I use a mixture of dark and golden)

1 T. grated Parmesan cheese

1½ tsp. onion powder

1/2 tsp. cayenne or black pepper  (I like cayenne best; my husband likes black best)

¼ c. sesame seeds 

¼ tsp. salt

½ c. water

DIRECTIONS:    Preheat oven to 350º.  Line the bottom of a 12×17 cookie pan (with sides) with parchment paper and set aside.  In a mixing bowl, mix the dry ingredients well with a wooden spoon.  Add water and stir to blend until all ingredients are moistened with the water.  Break up or crumble the dough onto the parchment paper evenly.  I use plastic gloves, but covering your hands with sandwich baggies will work.  Press the dough evenly over the paper to fill the pan.  I know it will seem like there’s not enough dough to reach the edges and it will seem very thin, this dough.  But trust me, it WILL reach the edges of the pan if you are patient and diligent with your pressing.  Smooth the dough until there are no holes or gaps in it throughout the entire sheet.  Check for places places where it may be thicker and smooth them out.  You  want this as even and thin throughout as possible.  If you want, you can cover the dough with plastic wrap and roll a smooth/straight-sided glass or rolling pin over it for a smoother surface, but I personally don’t bother with that.  Score the dough gently with a knife into 64 crackers (8×8).  This is done best by pressing the knife into the dough and gently lifting it straight up repeatedly.  I you drag the blade too fast through the dough, or back and forth, that will tear the dough up.

Bake at 350º for about 10 minutes.  Check often as flax burns easily.  The outside crackers will brown much faster, so I actually check at about 10 minutes and every 5 minutes thereafter to remove the outer ones to a platter as they brown.  Then I  put the pan back in the oven for the rest to finish browning.  I burned my first batch of flax crackers, so I learned my lesson.  Pop the remaining crackers back in the oven to finish browning.  When all crackers are done, turn the oven off, return all of the crackers to the the pan and set it back in the cooling down oven to “crisp up” to their ultimate crispness.  If you go to this extra step, they stay crisp for days and days in a ziploc bag.  When I don’t go to this trouble, they soften up on me and I have to go back and re-crisp them in the oven 2 or 3 days later.    Just my experience.   Store in a ziploc bag or airtight container.  DO NOT refrigerate or they will lose their crispness.

NUTRITIONAL INFO:   Makes 64 crackers, each contains:

18.1 cals, 1.43g fat, 0.98g carbs, 0.84g fiber, 0.14g NET CARBS, 6.65 g protein, 11.5 mg sodium

Sunflower Cheddar Crackers

This was one of the first recipes I developed for crackers 14 years ago when I started this lifestyle.  The have that sunflower nutty taste and just a smidge of cheese to round them out.  I still make these when I remember to buy some shelled sunflower seeds at the Dollar Store.  These pack so much flavor I usually eat these as a snack by themselves.  

Because of the sunflower seeds, these crackers are not suitable until you reach the nuts and seeds level of Phase 2 Atkins.

INGREDIENTS:

1½ c. roasted and UNsalted sunflower seeds
1½ c. grated cheddar cheese
¼ c. water

Preheat oven to 325º. You need a 13 x 15 cookie sheet pan and parchment paper for these.

Process sunflower seeds to a fine meal. Add the cheese and process until smooth. Add water and process until it becomes a dough ball.

Cover bottom of sheet pan (cake roll pan 13″x15″) with parchment paper. Put dough in even globs on the parchment. Now the fun begins. Using plastic gloves (I keep them on hand for such things) or a plastic sandwich bag as a glove, press out evenly all the way to the edges of the pan. BE PATIENT! This takes a few minutes, but it WILL spread all the way out and be a very thin dough. If you get “holes” in the dough, press them out. With a knife tip, lightly (& carefully so as not to tear dough) score the sheet of dough into 92 crackers approximately 1″x1½” in size (7 crackers across the short side and 14 down the long side). If desired, sprinkle any of the following on the tops: cayenne pepper, black pepper, onion powder, garlic powder, rosemary crushed fine, oregano, Indian Garam Masala, black pepper. I did one row of each and one row plain and we liked them ALL!

Bake exactly 30 minutes at 325º. Remove and WHILE STILL HOT, complete the scoring with a knife to separate the crackers. If you wait until they are cool, they’ll be too brittle and will break all to tiny pieces.

I can see using these for not-too-stiff sour cream or yogurt dips, as a soup/cheese compliment or just by themselves!

NUTRITIONAL INFORMATION:

Makes 92 crackers
Serving size = 3 crackers

Each serving has: 60 calories;
5.2g fat; 1.6g carbs, 0.69g fiber, 1g NET CARB and 0 2.7g protein, 1.0 g NET CARB

Barley Flour Crackers

Since my kidney stone ‘adventure’ in December, trying to accommodate the doctor’s request to follow a low-oxalate diet, has become a priority. One of the things I must avoid is most wheat product from my diet (this means even my lower carb beloved Einkorn flour). So now I’m starting to experiment with barley flour. Today, I tried a new cracker experiment that we both loved. My picky husband kept coming back to the kitchen for a couple more.

The crackers around the outer edge of the pan that typically brown too fast, at least did not taste burned as with all almond flour and flax meal crackers. I did not feel compelled to remove them early from the pan for the first time ever with low-carb crackers. These crackers are more crunchy/crisp than my other low-carb crackers, too! They suspect they will hold up nicely to dips or any toppings. I did encounter more difficulty pressing the base recipe’s dough out, finding barley flour drier, so it requires more water and a little more oil than my other cracker recipes. Even with those additions, I still wasn’t able to get the dough all the way to the edge of my 11×17 pan. I managed a sheet of cracker dough about 8×14 in each pan, which, after scoring, rendered 42 crackers in each pan (cut into 7 rows x 6 columns). I’m very pleased with this new cracker. I’ll start trying out different seasonings and additives in future batches.

INGREDIENTS:

2 c. barley flour

1 c. almond flour

½ c. golden flax meal

2 T. oat fiber

¼ c. grated Parmesan cheese (I used Kraft)

2 tsp. baking powder

1½ tsp. salt

1 tsp. onion powder

1 1/3 c. warm water

3 T. extra light olive oil

VARIATIONS: Add 2 tsp. seasoning choice: my homemade Montreal Steak Seasoning, my Cajun seasoning, coarse black pepper, Everything Bagel blend , or my Ranch Blend.

DIRECTIONS:  Line two 11×17 sheet pans with parchment, cut to fit.  I use plastic food-service gloves to press dough into pans.  You can use a third sheet of parchment if you don’t have any or a plastic sandwich bag on your hands.  Preheat oven to 350º.

Stir warm water +olive oil together in a small bowl and set aside. In a large bowl, measure out all the dry ingredients. Stir well with a fork. Add the water and oil mixture and stir well with fork to moisten the dough.  It will be clumpy and crumbly.   Divide the dough roughly into two portions and using hands crumble half the dough over each pan.  Press or roll the dough to about 8″ x 14″. I use a small piece of parchment under my hands so it doesn’t stick to my fingers while working. With a knife blade, cut/straighten up the edges as best you can for straightest edge possible.

Place pans in your freezer for about 12-15 minutes to help with scoring. Remove and press knife scoring gently into dough to form rows of 6 x 7 crackers, for 42 crackers per pan).  Lift the knife blade slowly to avoid messing up the cracker shapes.  If using a top seasoning, add it now. Pop pans into 350º preheated oven for about 18-25 minutes. Ovens will vary.  You don’t want to brown them too much, but they are most brittle when nicely browned.  Remove pans from oven and cool.  Separate into crackers with a knife point.  These crisp crackers are best when 100% cool. Store in lidded cracker container or gallon zipper plastic bag.

NUTRITIONAL INFO: Makes 84 crackers. One serving of 4 crackers contains:

104 cals, 5g fat, 13g carbs, 3g fiber, 10g NET CARBS, 4g protein, 235 mg sodium

Black Pepper Crackers

Click to enlarge

Early on in my low-carb journey I came across a pizza crust by Brittany Angell on RealSustenance.com that intrigued me.   Her sight and domain appear to have since shut down.  After making her recipe, I decided it was more cracker like than pizza dough like.  It was too thin and brittle for my taste……….definitely more like a cracker.   I adapted the pizza crust recipe to create what has become the BEST cracker recipe for me in my 14+ years of low-carbing.  I’m making crackers today, so I thought I’d share it with my readers once again.

This cracker is so good, I’ve now made this recipe probably 50 times or more in 14 years.  Since the predominant flavor is black pepper, I’m going to change their name to Black Pepper Crackers now.   These are delicious by themselves, with butter, toppings, dips or cheese!  Even my non-low-carb husband likes these!  I think the crisping magic here are the arrowroot and oat fiber, so I don’t recommend omitting or substituting for those two ingredients lest you end up with a totally different textured cracker than mine.

Let me say up front, my method for making the crackers does not read at all like the original recipe, but it sure produces a crisp cracker that STAYS crisp for days and days!   I changed amounts of come ingredients, added a couple things and definitely spiced them up a bit!  Those changes and additions are noted below in blue, including the oven temperature.  I also added a bit of oat fiber for a flour-y flavor, crunch and fiber.

This recipe is not suitable for Induction due to the oat fiber and arrowroot flour.  It isn’t suitable for Primal-Paleo unless you omit the oat fiber and cheese.  This is a really BIG recipe that makes two full sheet pans of 48 crackers each.  Half the recipe if you do not want that many (tasting them will change your mind next time 🙂 ).  That said, they do keep well and stay crisp in a loose-lidded ceramic canister on my counter for 2 weeks or so.  That’s much better than any of my other cracker recipes keep for me.

You can also make round crackers that are slightly thicker but just as crisp (a bit more trouble & time consuming).  Using 1 level tsp. dough per round cracker, I only got 66 round crackers.  I show numbers below for the round version also.

Round version made in silicone muffin molds/liners

Round version made in silicone muffin molds/liners

VARIATION:   Omit the black pepper and add 1-2 T. of my 8-Seed Spice blend instead.

INGREDIENTS:

3 c. lightly packed almond flour (weighed out it was 11 oz. (311.8 grams)

4 T. arrowroot flour/powder

2/3 c. flax meal (I use a 50:50 mix of dark & golden)

2 tsp. baking powder

1 tsp. sea salt

1 T. onion powder

2 tsp. coarsely ground black pepper

2 T. oat fiber  (omit for gluten-free version)

¼ c. grated Parmesan Cheese

3/4 c. warm tap water

2 T. extra virgin olive oil

DIRECTIONS:  Line two large sheet pans (mine are 11½ x 17) with parchment.  I use plastic gloves to press crackers into my pans, or sometimes I cut a third piece or parchment, lay it on top and roll out the dough that way, using my gloved fingers to finish off the edges evenly.  The key is to get the cracker dough thin and even in the pan.  Thicker areas  don’t cook well; thinner areas will burn quickly.

Preheat oven to 350º.  Stir the warm water and olive oil together in a small glass to mix well.  Measure out all the dry ingredients in a large bowl.   Stir well with a fork.  Add the water-oil mixture to the dry ingredients and blend with the fork to form a solid ball of dough.  I form the dough right in the bowl into in a log shape and cut in half to divide it equally.  Crumble half the mixture onto each parchment-lined pan.  Roll the dough or, wearing plastic gloves, press the dough in the first pan evenly and all the way to the edges.  It will be very thin, and I always think it isn’t going to make it, but half the dough WILL reach the edge of the pan.  I like to roll the surface with a straight-sided glass I own.  If rolling with a rolling pin or straight glass, cover crumbles with parchment and roll as evenly as possible all the way to the edges of the pan.  You’ll likely have to finish the edges with your fingers (use a piece of plastic wrap if need be).  With a large chef’s knife, score the rolled dough into rows of crackers 6 x 8 (48 crackers).  Repeat this process with the second pan of crackers.

Although a lot more trouble and time-consuming, to make round crackers for parties, I use silicone muffin pans or silicone cupcake liners.  You can also use paper liners in a metal muffin pan.  Measure 1 level teaspoon of dough into each mold and press down evenly with a your fingers (I use plastic glove to do this to avoid dough sticking to me). Set silicone muffin pans and/or molds onto metal sheet pans for support. Pop the pans into the preheated 350º oven and bake for for about 20-22 minutes.  Ovens vary, so start watching them at 18 minutes.  Do not over brown!  I recommend removing those around the edges as soon as they begin to brown and those on the outside are inclined to burn. When all have browned, remove, cool 1-2 minutes, re-score with the chef’s knife and then let them cool completely before eating.  These are not tasty hot in my opinion.  The flavor develops when they have cooled.

Break apart and enjoy plain, with butter, cheese spreads (I’m addicted to them with chive & onion cream cheese) or your favorite hard cheeses or salami!  Store remainders in a plastic zip bag or any canister of your choosing.  I just use a ceramic cookie jar on my counter.  These stay crisp for around 2 weeks.  Mine get eaten within 2 weeks, so I honestly don’t know if they would keep longer or not.  🙂

NUTRITIONAL INFO:    Makes 96 square crackers, each cracker contains:

28.4 calories, 2.38 g  fat, 1.32 g  carbs, 0.68 g  fiber, 0.64 g  NET CARBS, 0.97 g  protein, 37 mg sodium

NOTE:  If you make round crackers pressed into silicone muffin molds/cups you will only get 66 crackers, using 1 level tsp. dough per cracker.  Each round crackers will contain 41.3 calories, 3.46 g  fat, 1.91 g  carbs, 0.98 g  fiber, 0.93 g  net carbs, 1.41 g protein and 54 mg sodium

Spicy Cheese Thins

Spicy Cheese Thins

We’ve covered the ground on soups, entrées, meat dishes, seafoods and vegetables.   Now let’s move on to the fun stuff:  snacks.  I actually actively avoid snacks to facilitate correcting insulin resistance.  With intermittent fasting, it’s just not allowed.  But with my eating window being 5-7pm, I am allowed a snack a little ahead of the meal if I’m struggling to make the full 23 hours of fasting.   So I’ll begin with an item that is often needed to consume certain snacks…….crackers.  I have a variety of cracker recipes now and would like to re-share them with my newest readers, as I’m pleased enough with them I no longer feel a need to create and post new ones.

This recipe, one of my very first cracker trials, is a variation of an Almond Thins cracker recipe posted on Low Carb Friends forum (no longer exists).  It allows itself to nicely be tweaked for a ton of wonderful savory and even sweet variations.

I took the basic almond flour thins recipe, doubled it, omitted the Splenda and then added cheese and one of my favorite seasoning combinations.  I was looking to achieve a cracker reminiscent of Cheez-its® or Pepperidge Farm Goldfish®.

My version is VERY crispy provided you allow them to brown a bit!  Less browning results in a not-so-crisp cracker………tasty, just not as crisp as I like.   They are good alone or they and delicious with soup! You can eat five of these crackers for under 2 net carbs, so definitely my kind of cracker!  These are not suitable until you get to the nuts and seeds rung of the Atkins OWL (Ongoing Weight Loss) ladder.

VARIATION:  For an even cheesier taste, you can add 2 T. Nutritional Yeast to the dry ingredients when mixing the dough. 🙂

INGREDIENTS:

2 c. almond flour

2 egg whites from large eggs

¼ tsp. onion powder

1/8 tsp. cayenne pepper (optional, use more if you like things hot)

1/8 tsp. chili powder

1 c. grated Cheddar cheese (½ c. more if you want them cheesier)

¼ tsp. salt (optional)

DIRECTIONS:  Preheat oven to 325º. Cut parchment paper to fit exactly the bottom of an 11″ x 16½” sheet pan.  Just set the paper on your kitchen counter for now.  Mix almond flour and seasonings in a bowl.  Add egg whites and stir with a fork.  Add cheese and continue stirring until it forms a moist dough.  Spoon (or crumble with your hands) the dough evenly onto parchment working from the center out. Cover the dough blobs with a sprayed/oiled sheet of waxed paper the same size.  Using a rolling pin, roll dough into a single, smooth rectangular sheet of dough the size of the parchment.  Be careful to not let the dough exceed the piece of parchment paper. If it does, put those bits back into the sheet and roll smooth again.  You definitely want this dough to go all the way to the edges of the parchment paper so the crackers will be thin enough to be crisp.

Slowly and carefully lift off the waxed paper.  Use the tip of a pointed knife to lift up two corners and with your hands, applying tension to keep the sheet stiff, carefully lift parchment, dough and all onto the baking sheet.  If you cut it the right size, it should sit right down on the bottom nicely.  Using your sharp knife, carefully (and gently since the dough is fragile) score the dough into cracker shapes (8 x 10, making 80 crackers total).  Pop into your preheated 325º oven and bake for about 10-11 minutes or until lightly browned.  The outer rows brown faster, so you will likely need to remove outer rows as soon as they are browned so those don’t get over-browned while  the center ones finish cooking.  Cool a few minutes and separate into separate crackers along your score lines.  Store in an airtight container or ziploc bag.  NOTE:  If these lose their crispness on day 2 or 3 (due to high oil content of cheddar cheese) re-crisp on a baking sheet in a 325º in the oven for about 10 minutes.

NUTRITIONAL INFO:  Makes 80 crackers, each cracker contains: (using 1 c. cheese only)

23.5 cals, 1.98g fat, 0.64g carbs, 0.3g fiber, 0.34g NET CARBS, 1.12g protein, 20 mg sodium

5-Spice Miso Moringa Soup

I finally decided to try one of the packets of Miso Soup I bought eons ago at the grocery store. I had no idea what flavor(s) to expect, but thought I’d try it and get creative. This was quite a surprise, as the light, flavorful result, with my additions, was quite good for lunch today. We’ll see if it staves off afternoon hunger pangs and holds me until dinner.

These packages when purchased have 3 single-serving packets inside the outer package. Since there are two of us, I made up all 3 single servings, assuming my husband would eat 2 large 1½ c. bowls (which he did). I just ate one bowl to be quite full. Of course, knowing me, after a quick taste with just water, per instructions, I decided it was just “meh” and I would not eat it unless I expanded the flavor profile. I added several vegetables, a few flavorings and ended up with a light soup I will certainly prepare again.

This soup is suitable for all phases of Atkins and other Keto diets. Paleo and Primal followers can also enjoy this one.

INGREDIENTS:

3 individual packets Marukome Miso Soup (tofu flavor)

3 c. water

1 c. homemade beef broth (or chicken, pork)

1 sliced fresh mushroom

3/4 c. sliced cabbage

1 oz. red bell pepper, sliced or chopped coarse

1/2 c. green onion tops, sliced ½”

12 dried tiger lily buds, chopped ½” (optional)

1 T. Hoisin Sauce

1 tsp. low-sodium soy sauce

¼ fish sauce (I use Thai Kitchen)

¼-½ tsp. Sriracha chili sauce

¼ tsp. Chinese 5-spice blend

1 T. dried moringa leaves

5-6 Baby Bok Choy leaves (added last 2 minutes of cooking)

DIRECTIONS: Place all ingredients but the Baby Bok Choy leaves into a 2 qt. sauce pan. Bring to boil and reduce heat to simmer soup for about 5-7 minutes to allow vegetables and mushrooms to cook. Add Baby Bok Choy leaves and cook just 2 minutes to just slightly wilt them but keep them bright green. Serve soup at once.

NUTRITIONAL INFO: Makes 4 bowls of soup, each contains:

112 cals, 3g fat, 10g carbs, 2g fiber, 8g NET CARBS, 10g protein, 751 mg sodium

Blue Crab Stuffed Fish

This is a delicious and very easy dish to prepare.  It’s one I developed while we lived down on the Texas Gulf Coast, where I had access to the freshest, sweetest Blue Crab right off the dock.  Now, since retiring and settling in Central Texas (to get away from hurricanes), I have to make do with what comes in a little carton in the seafood aisle of my grocery store.   Not as good, to put it mildly.  But even that beats the heck out of boarding up and preparing your home for 2-3 hurricanes a season.  Because this dish uses low-carb flax-based bread, this is OK for Induction.  I would NOT recommend substituting pork rinds in this recipe.   I think you will be disappointed if you do.

INGREDIENTS:

½ recipe my Blue Crab Stuffing

6   4-oz. flounder filets  (or any mild white-flesh fish filets)

2 T. butter, unsalted

1/4 tsp. my Seafood Spice Blend

DIRECTIONS:   Preheat oven to 350º.  Make the stuffing as instructed in that recipe.  Using the spoon you used to stir the stuffing, equally mark off 6 portions in the skillet.  This helps ensure each filet will get an equal portion of filling.  Melt the 2T. butter in a baking pan.  Take each fish filet in one hand, placing the center of the filet in your palm.  Spoon 1/6th of the stuffing into the center.  Then with your other hand, fold the tail flap over the stuffing, then the header flap on top.  Gently turn over and place seam down onto the baking pan in the melted butter.   With a brush, baste the top and sides of each “roll” with butter from the pan.  Sprinkle each with a bit of Seafood Spice Blend.  Pop into a 350º oven for about 25-30 minutes.  Lift gently with a long spatula when plating, so as to not disturb the filling that invariably spills out of the roll at each end.

NUTRITIONAL INFO:  Makes 6 servings, each contains:

280 cals, 18.3g fat, 2.87g carbs, 1.23g fiber, 1.64g NET CARBS, 26.7g protein, 350 mg sodium

Fish Filet in Shawarma Sauce

This quickly thought-up menu turned out to be one of the best fish dishes I’ve created in a VERY long time!  I just can’t believe how good it is to be so simple.  A great recipe for weeknights when you’re tired after a long day at work.  This recipe just made my regular fish recipe rotations, for sure!  I don’t believe I’ve ever used my shawarma spice on seafood before, but will be definitely be doing so again in the future!  It’s truly delightful on fish!  It was almost like a Hollandaise sauce, but without all the fuss, since I keep a fresh batch of homemade mayo made up all the time.  This dish is acceptable for Atkins Induction and is Paleo friendly if you use coconut milk in lieu of the cream.  You can use Swai, sole, flounder, tilapia, bluefish, halibut or any mild fish.  I’ve even used this sauce on broiled salmon and liked the results.  I keep this spice blend made up in my spice rack so making this is a snap at my house. 🙂

INGREDIENTS:

4   5-oz. fish filets or fish filet portions of your choice

2 T. unsalted butter

1½ tsp. Shawarma Spice blend

1/3 c. homemade mayonnaise

2 T. heavy cream

Pinch salt

DIRECTIONS:    Stir 1 tsp. of the spice blend and the cream or coconut milk into the mayo in a small saucepan and set on burner set to lowest possible heat setting.  Now to sauté the fish.  Melt the butter in a non-stick skillet or griddle over medium-high heat. Pat any moisture off the fish with paper towels and sprinkle both sides evenly with the remaining ½ tsp. shawarma seasoning and a pinch of salt.    Raise heat to high and sear the fish on both sides until golden brown and done in center (takes just about 3-4 minutes on a side.  Plate the filets and spoon about 2 tablespoons of the creamy sauce over each portion.    Serve with a green vegetable or nice green salad.

NUTRITIONAL INFO:  Makes 4 servings, each contains:

338.5 cals, 25g fat, 0.63g carbs, 0.13g fiber, 0.5g NET CARBS, 28.3g protein, 83 mg sodium


Indian Broiled Fish

A lot of Indian food fans don’t realize what a stellar job they do with fish in India.  Many menus don’t have it on the menu, but a quick perusal of an Indian cookbook will have you realizing they eat a lot of fish.  Their exotic spices compliment fish in the most wonderful way. 

Originally posted in 2010, I thought of this recipe today and am fixing this for dinner tomorrow night, I think.  This baked fish dish goes together really fast, so it is an easy meal prep during the summertime when you’d rather be outdoors having fun than cooking in the kitchen.  If you wish, you can use whole fish for this recipe.  This spice mixture would also be good on flounder or trout.  This recipe is Induction friendly.  The batch pictured has 1 small Roma seeded and finely chopped.  I enjoy this entrée both with and without the tomato.  I have not included the tomato in the recipe or nutritional stats, however.

INGREDIENTS:

2   8 oz. tilapia or flounder filets (or white flesh fish of choice)

1 tsp. minced ginger root

1 tsp. minced garlic

1 finely chopped jalapeno, seeded and chopped

1 T. chopped cilantro

¼ tsp. turmeric

Dash each of cayenne & black pepper

3 T. unsalted butter, melted

Dash/sprinkle of Garam Masala spice blend

OPTIONAL:  2 tsp. tomato sauce or 1 small tomato chopped on fish before spices added is very good.

DIRECTIONS:  Mix all ingredients in a glass bowl.  Do not use a plastic bowl or the turmeric will permanently stain it.  Add melted butter and mash it all up together.  Place fish on oiled, non-stick or parchment-lined pan.  Spread tomato sauce or chopped tomato on side that is up (if using), add seasoning mixture evenly on the top of each filet.  Broil for about 10 minutes (15or so for whole fish), until thickest part of the filet is firming up.  Or, you can bake for about 20 minutes (30 minutes for whole fish, depending on size), but I personally think broiling is best.

NUTRITIONAL INFO: Serves 2, each serving contains:

327 cals, 15.5g fat, 1.6g carbs, 0.5g fiber, 1.1g NET CARBS, 45.5g protein, 123 mg sodium

Asian Shrimp Patties

These super easy, tasty shrimp patties make a wonderful lunch for us.  We both LOVE ’em.  They are suitable for all phases of Atkins and Keto diets.  This recipe was one of the first ever posted on my blog back in 2009.  But it is still a keeper  we enjoy occasionally.  

INGREDIENTS FOR SHRIMP PATTIES:

8 oz. raw, peeled shrimp
1/2 tsp. chili paste (I use Sambal Oelek)
2 cloves minced garlic
1 1/2 tsp. minced shallots or green onion
juice of 1/2 lime
1 tsp. lemon grass, grated (if available)
1/4 of a Revo Roll or other low-carb roll, crumbled

INGREDIENTS FOR DIPPING SAUCE:
1 ¾ tsp. sesame oil
1/2 tsp. peanut butter
2 tsp. rice vinegar
1/2 tsp. grated ginger
2 cloves minced garlic
1/4 tsp. chili paste or Sriracha sauce
1 tsp. Splenda or sweetener of your choice
1 T. low sodium soy sauce

Process all the ingredients for the patties in a food processor or blender until well blended. Shape into 6 small patties and brown in a skillet rubbed with an oiled paper towel.  You’ll know when they are done as they become visibly opaque and golden brown.  This recipe is technically not suitable until Phase 2 OWL due to sauce ingredients, but the patties themselves are OK for Induction and there’s so little PB and rice vinegar in the sauce, it probably won’t cause you problems or cravings even if still in Atkins Induction phase.

NUTRITIONAL INFORMATION:  Makes 3 servings, each contains:

142 cals, 6.33g fat, 3.5 g  carbs,0.92 g fiber, 2.58g NET CARBS, 17.6 g protein, 178 mg. sodium

Barley Flour Hot Dog Buns

I have been experimenting today with my Gluten-Free Hamburger Bun recipe.  Having had my first kidney stone in December, the diet they gave me to follow to help prevent formation of future stones says I need to reduce my intake of foods high in oxalates, which includes nuts, nut flours and wheat products.  Well, I already use minimal wheat products.  When I do, I use Einkorn wheat, which is not genetically modified.  But I’m starting to test replacing almond flour, CarbQuik and Einkorn wheat from my baked goods with barley flour, which is a better choice me.  Bob’s Red Mill has small bags and Honeyville carries it in bulk.  Another plus with barley flour is it is neutral in flavor.  It is also low in oxalates that I must now try to eliminate everywhere I can.  My husband has also had one kidney stone, so this low-oxalate diet is a must for both of us now.    Hardest part for me to reduce is spinach……probably the highest oxalate food there is.     

My favorite hamburger bun recipe contains almond flour, so I baked it today subbing in the barley flour for the almond flour and the whey protein in that recipe.  Sandwich buns are a staple in my kitchen.  A quick sandwich is our preferred lunch most days.  Creating a bread that is moist, sturdy, tasty and meets my husband’s strict requirements, being a staunch bakery fan, has been difficult.  These are very neutral in flavor and absolutely do not drown out the flavor of your grilled burgers like so many low-carb breads do.   They are so sturdy they do not break apart under the heat of the hot franks inside.  That says a lot right there!  They achieve this sturdiness NOT at the price of “moist” either.  They are not the slightest bit dense, “dry” or difficult to swallow.  These are very soft just like real hamburger buns!    

For those familiar with my Gluten-Free Grain Free Focaccia Bread recipe, that batter is my inspiration for these.

These buns are not suitable for Atkins Induction, but are acceptable once you get to Phase 2 OWL nuts and seeds level of the carb re-introduction ladder.  They are also suitable for other Ketogenic diets and Primal followers if dairy is occasionally consumed.  These buns are not suitable for a Paleo lifestyle due to multiple dairy ingredients.

INGREDIENTS:

3/4 c. barley flour

¼ c. golden flax meal

2 tsp. baking powder

3 T. plain yogurt (or softened cream cheese)

2 large eggs

1½ c. mozzarella cheese shreds

1 tsp. cider vinegar

1 T. heavy cream

1 tsp. dry yeast + 1 tsp. sugar (consumed by yeast) dissolved in 2 T. warm water

Poppy or Sesame seeds (optional)

DIRECTIONS:  Preheat oven to 350º.  Soften cream cheese (if using) in medium mixing bowl in microwave or add the yogurt to the bowl.  Add the dissolved yeast/water mixture.  Beat in the eggs, cream, water, vinegar.  Measure and add in all the dry ingredients and stir well.  Fold in the mozzarella cheese with a rubber spatula until well mixed.   It will thicken as you fold.  Divide batter evenly amongst six hot dog mold slots.  I use a silicone mold for my hot dog buns, so no need to grease it.  

Using a 1/3 c. measuring cup, scoop up 1/3 c. batter and fill each of your 6 molds, spreading the batter evenly with the back of a fork to fill the slots level.  You’ll need to use your finger or a tiny rubber spatula to get all the batter out of the measuring cup, most likely.  Batter will be about ½” thick in the molds.  If you run short of batter, even it out to make 6 total.  Sprinkle on sesame or poppy seeds if you wish before baking.  Pop pan into a 350º oven and bake 20-22 minutes or until done to the touch in the center and lightly browned on tops.  Cool a few minutes.  Slip them out of the molds with a knife tip.  When totally cooled, slice carefully for receiving your cooked franks.  Store any leftover in a plastic bag in your refrigerator.  

NUTRITIONAL INFO:   Makes 6 hotdog buns, each contains:   (doesn’t include seed topping, if used) 

228 cals, 10g fat, 18g carbs, 3g fiber, 15g NET CARBS, 11g protein, 347 mg sodium 


Tuna Casserole

Back in 2009 when I began my Atkins journey, there weren’t all the low-carb noodle options out there we have today.  And since tuna casserole was a personal favorite, I had to get creative.  This was one of the earliest creations back in 2009 when I started low-carbing.  I threw this together one night with some leftover green beans and decided I didn’t need noodles to enjoy a favorite comfort food.  It came out tasty and had a new twist.  I added in some jicama.  The jicama gives a crunch similar to water chestnuts, but jicama has even fewer carbs!  The jicama adds no flavor, just crunch, so you can omit it if you like.

INGREDIENTS:

6.5 oz. canned or foil pouch tuna (I use oil pack)

2 c. cooked frozen green beans (French style or cut whole)

½ c. jicama, peeled or water chestnuts, julienne sliced (or slivered almonds)

½ c. canned mushrooms (2 small cans), with their liquid

½ c. cream

¼ tsp. onion powder

¼ tsp. my Seafood Spice Blend (key flavor ingredient, so don’t skip)

2 slices American cheese

½ c. grated Cheddar cheese

Dash pepper

1/4 tsp. xanthan gum

VARIATION:    Add some finely diced red bell pepper or pimiento for a slightly different flavor.  🙂

DIRECTIONS: Cook the frozen green beans until just, drain and put in a mixing bowl.  Peel and dice the jicama and add to the bowl.  Add the canned mushrooms, cream, tuna and all spices.    Stir in xanthan gum and blend all well.  Pour into microwaveable baking dish.  Top with American cheese slices first and then with the grated cheddar.  Pop into a 350º preheated oven for 20-30 minutes to blend flavors and thicken up.

NUTRITIONAL INFO:  Makes 4 servings, each contains (using jicama):

307 cals, 22g fat, 9.53g carbs, 3.55g fiber, 5.98g NET CARBS, 19g  protein, 450 mg sodium

Shrimp-Stuffed Eggplant

Shrimp Stuffed Eggplant

It’s what’s for dinner tonight!  We never tire of this recipe.  This is a bit higher in carbs than most of my low-carb entrées, but this tasty dish brings so many nutrients to your plate, it’s worth it.  There’s a good bit of your daily total veggie requirements in one meal!  This dish is OK for Atkins Induction Phase, by the way.  You can eat the entire thing, too, filling and shell, as the shell is so tender by the time it’s done you won’t find that skin tough at all!   Hope you’ll try this yummy dish soon!  If you’ve never had seafood and eggplant together, you’re going to find out that’s a flavor match made in Heaven.

INGREDIENTS:

10 oz. peeled shrimp, cut into thirds

1 whole 10 oz. eggplant, stem cut off

3 T. unsalted butter

1 clove minced garlic

2½ oz. each chopped onion, celery and red bell pepper

1/3 c. chopped parsley

2 slices bacon, chopped

10 drops Tobasco®

¼ tsp. my Seafood Spice Blend (optional)

1/2 flax sandwich bun, crumbled (or other low-carb bun)

1 T. parmesan cheese, grated, for topping

DIRECTIONS: Preheat oven to 375º.  Fill baking dish with ½” water.  Cut eggplant in half lengthwise and place cut side down in water.  Bake for about 30 minutes until flesh is tender.  Cool slightly, carefully scoop out pulp, leaving about 1/4″ flesh attached to skin for better support of the filling.  Try not to tear/cut outer skin when scooping out the pulp.  When cool, chop the scooped out eggplant pulp up and set aside.  Pour off any remaining water from the baking dish, lightly grease and place the empty shells right back in the same pan.

Over high heat, brown the bacon in non-stick skillet.  Drain off grease for some other use.  Melt butter in the skillet and add garlic, chopped onion, celery and red bell pepper.  Sauté until vegetables are tender.  Add parsley, shrimp, spice blend, Tobasco®.  Cook until shrimp are opaque.  Crumble sandwich bun and add.  I also like to add a shake or two of cayenne pepper.  Add chopped eggplant pulp, and stir to mix all ingredients well.  Fill shells (will be mounded quite a bit), sprinkle with parmesan cheese.  Lower oven to 350º and bake for about 30 minutes or until lightly browned on top.  Serve with a nice green salad.

NUTRITIONAL INFO: Serves 2 adults.  Each stuffed eggplant half contains:

513 cals, 32 g fat, 19.3g carbs, 8.35g fiber, 10.95g NET CARBS, 41g protein, 571 mg sodium

Air Fryer Coconut Shrimp

Seafood with a Hawaiian twist.  We just love these.  These air-fried Parmesan-coconut shrimp are so good you need to try them.  If you don’t have an Air Fryer, just bake them off on a sheet pan at 350º until they are browned on both sides.  No strong with coconut flavor, but that suits us both fine.

I would have never bought myself an air fryer, but my husband went and did so for my Christmas present, so I’m trying to learn how to cook different things in it.  I’ve since had to purchase a new wall oven and it has an air fryer feature built in.  I use my Power XL basket fryer for small amounts of food; the Frigidaire oven ‘air fryer’ mode for larger amounts of food.

I’ve seen so many recipes for coconut shrimp on the internet, but the coatings can be pretty high carb.  I have trimmed down the carbs and reached a total count of 1.8 net carbs per 6-shrimp serving!  I did this by looking to my popular Oven-Fried Fish coating and then modified it even further.    The end result is a dish we have had several times now.  My husband really loves these shrimp and he’s not particularly fond of coconut!  The Parmesan helps tone down the coconut taste a bit for us.  This meal is suitable once you get to Phase 2 of Atkins ‘nuts and seeds’ level.

INGREDIENTS FOR SHRIMP:

26 medium-large raw shrimp, peeled and de-veined

1 low-carb slice of bread or roll (I used a Smart Bun )

½ c. pork rind crumbs (about 1 c. whole pieces)

¼ c. grated dry Parmesan

1 oz. desicated unsweetened coconut

1/3 c. Carbquik or other low-carb bake mix

3 egg whites

¼ tsp. my homemade Seafood Spice Blend

¼ tsp. sea salt

INGREDIENTS FOR OPTIONAL BANG BANG DIPPING SAUCE: 

½ c. homemade mayo (or from jar if you prefer)

1 T. Sambal Oelek Asian chili saucebang-bang-sauce

2 tsp. Sriracha sauce

Dash each salt and pepper

DIRECTIONS:   Mix up the sauce ingredients well in a small bowl and refrigerate until ready to serve shrimp.   Drain off any water in the bag of shrimp.

In a food processor, crumb the pork rinds until fine, removing any large, hard chunks.  Add the low-carb bread/roll, Parmesan cheese, coconut, spice blend and salt.  Pulse until smooth mixture.  Pour into a medium bowl.  Break the egg whites into another small bowl.  Place the Carbquik in yet a third small bowl.  Line the bowls up beside a cookie sheet lined with parchment paper or silicone mat:   flour first, egg whites second and crumb mixture last.  Dip the shrimp first into the flour with your left DRY HAND, then drop into the egg whites.  With your right WET HAND, turn each shrimp in the egg white to coat both sides.  With the wet hand, drop the shrimp lastly into the crumb mixture without touching the crumb mixture with your WET HAND.  With your left DRY HAND, toss the crumbs up over the shrimp to also coat on the tops (will be coated on the bottom from having been dropped into the crumbs).  With your left DRY HAND, pick up and place gently on the parchment lined pan.  Repeat until all shrimp have been cooked.   If your hands get gooey/messy, just wash and dry them off mid process.

Preheat you air fryer for 3 minutes.  Also preheat your regular oven at the lowest setting or around 200º-250º.  I can do 12-13 large shrimp in my 7-qt. Power XL fryer at a time, so that means 2 batches.   Do not crowd the shrimp even if you have to cook three batches if using a smaller fryer than mine.

Fry first batch of shrimp at 370º for 4 minutes.  Gently turn shrimp over and fry 4 more minutes.    When I placed the remaining shrimp on the fryer tray and turned it on for 8 more minutes (turning at 4 minute mark), I then placed the pan with the first batch into my regular oven to keep it warm until the second batch was done.   If needed, fry your third batch similarly.  When all are done, plate and serve with the Bang Bang Sauce or other sauce of your choosing.

NUTRITIONAL INFO:   Makes four 6-shrimp servings, each contains (not including sauce):  176 cals, 10g fat, 11g carbs, 8g fiber, 3g NET CARBS, 19.37g protein, 509 mg sodium

1/4 batch sauce adds:  200 calories, 22g fat, 1.05g carbs, .02g fiber, 4.5g protein and 175 mg sodium

Shrimp Cauliflower Curry


We just love Indian food and I make it a little different every time, to be quite honest.  I rarely use a recipe but they always come out good!   This boasts a complex spice flavor profile I think you’ll like.  I often add cauliflower or mushrooms (or both) to curried chicken or shrimp, so this curry has just the cauliflower .  Pretty good combination, actually.  Indian cuisine uses a lot of cauliflower, in fact.  This Induction friendly dish pairs nicely with a cucumber mint salad or a crisp green salad.

INGREDIENTS:

2 lb. raw shrimp, shelled and cleaned

4 oz. onion, chopped or sliced thinly

1 T. olive oil

3 T. butter

3 plum tomatoes, cubed quite large

2 c. cauliflower, cooked until just barely tender

1½ c. chicken or seafood broth

4 oz. cream

1 tsp. grated fresh ginger root

2 tsp. my Garam Masala   

2 tsp. curry powder

1½ tsp. cumin seed

1 tsp. ground cumin

½ tsp. turmeric

½ c. cilantro leaves, coarsely chopped (optional)

¼-½ tsp. Xanthan or guar gum to thicken.

DIRECTIONS: Heat a non-stick wok or large non-stick skillet over high heat.  Add cumin seed and Garam Masala and dry roast for a minute or two, stirring until it smells aromatic.   Add oil and butter and sliced onion.  Saute until onion begins to brown.  Add shrimp, tomatoes, chicken broth, ginger, ground cumin, turmeric and lower heat to medium-low.  Simmer for 30 minutes.  Lower heat to lowest setting and add cooked cauliflower, cilantro and cream.  Stir well and continue to simmer on low heat.  When cilantro loses it’s vibrant green color, thicken with successive light dustings of the xanthan or guar gum, stirring continuously, waiting a couple minutes between dustings so as not to overdo the thickening.  When thickened to suit, serve immediately. For anyone at the dining table NOT ON ATKINS, this is divine on steamed basmati rice.  Me, I eat it like a soup or stew, with a spoon. 🙂

NUTRITIONAL INFO: Makes 6 servings, each containing:

290 cals, 3.5 g fat, 7.43 g carbs, 2.4 g fiber, 5.03 g NET CARBS, 33.67 g protein, 438 mg sodium

Chipotle-Lime Shrimp Scampi

Once you get your ingredients together, this dish goes together in about 15 minutes flat!  My kind of recipe!  Both hubby and I REALLY liked this slightly different shrimp scampi creation.  This recipe is the reason I use unsalted butter exclusively.  The shrimp has a lot of sodium in it naturally.  One serving provides 57% RDA vitamin B12, 45% vitamin D, 35% vitamin A, 38% copper, 42% iron, 26% niacin and 38% phosphorous, so this is a very nutritious dish!  It is also acceptable for Atkins Induction Phase and other Keto diets.  When you get to OWL (Ongoing Weith loss), 2 T. white wine added to this adds a nice flavor layer!

INGREDIENTS:

1 lb. shrimp, peeled and cleaned

2-3 cloves minced garlic (I use 3)

½ stick unsalted butter

Juice of 2 limes (about 2-3 T.)

1/4 c. finely chopped parsley

1/8 tsp. smoked chipotle powder (if you can’t get it, use cayenne pepper)

¼ c. heavy cream

Sprinkle of xanthan gum to slightly thicken

2 c. spaghetti squash threads (½ c. per serving)

DIRECTIONS: Cut a medium spaghetti squash in half, remove seeds and put cut side down into shallow dish filled with 1/4″ water.  Microwave on HI for 13 minutes.  Drain and fork out threads and put in serving bowl with tight cover so squash will stay hot while you cook the shrimp topping.  In a non-stick skillet, melt butter.  Add minced garlic and sauté until cooked but not burned.  You don’t want a raw garlic taste to dominate the final dish.  Add chipotle powder and shrimp and sauté until shrimp curl and are opaque.  Add parsley and lime juice and immediately lower heat to lowest setting.  Add cream and stir well.  Dust lightly with xanthan gum and stir until slightly thickened.  Serve over spaghetti squash threads with a nice green salad!

NUTRITIONAL INFO: Makes 4 servings, each containing:

303 cals, 19.2g fat, 9.15g carbs, 1.38g fiber, 7.77g NET CARBS, 24.4g protein, 194 mg sodium

Seafood Pirogues

I like to re-invent leftovers so they are, visually or taste-wise, quite different than their first incarnation.  This particular dish was born from 1 c. of leftover Cheesy Crawfish-Yellow Squash Casserole I had in my freezer.  I bought some gorgeous large shrimp at Sam’s last week and they were right by the zip-loc bag of this leftover in my freezer.  I thought on it a few minutes and came up with this delightful dinner.  We have not had seafood in awhile, so this really sounded good and the dry ingredients for my Mozzy Dough are always made up at the ready in my pantry.  So piece of cake, as my Dad always said.

You are not going to have this Cheesy Crawfish-Yellow Squash Casserole leftover in your freezer, so you might want to mix up that recipe  up to just before baking it off step.  Then you will have some of the mixture to make these pirogues with and also have a little leftover mixture you can thaw for a quickie dinner/lunch one day.    

INGREDIENTS:

2 c. (1/3 recipe) my Cheesy Crawfish-Yellow Squash Casserole (minus final  breadcrumb topping)

1 recipe Mozzy Dough

20 large shrimp, shelled, peeled and de-veined

3 T. unsalted butter

¼ tsp. my Seafood Spice Blend (homemade Emeril’s blend)

3 T. heavy cream

DIRECTIONS:  Make the crawfish-squash recipe per recipe instruction only do not put the topping on or bake it.  Dip up 2 cups of the mixture for this pirogue recipe and freeze the rest for another meal or use. Stir the 3 T. cream into the 2 c. of seafood mixture and set aside.

Preheat oven to 350º.  Make a recipe of mozzarella Dough at the above link per that recipe’s instructions.  Divide the dough ball into four equal portions.  Press each portion either into the bottom and high up the sides of an oblong, oval pirogue-shaped pan, banana split dishes, or corn-on-the-cob dishes.  You can also use some other oval dish, as shape isn’t rocket science.  Alternately you can just roll out the dough into four 7″x3½” boat shapes on parchment-lined pan and curve the edges up a bit with your fingers if you don’t own these special-shaped pans.  Flat should still work as the filling is quite thick. 

Dough will slide down in the silicone pans during cooking (at least they did in mine), so you’ll end up with a much shallower boat in the end anyway, so be sure to press the dough high up the sides to start out.  The size of my boat crusts started out 2″ tall yet ended up more like 1″ tall after shrinkage.  I only have 1 of these little pirogue silicone pans (bought it on a clearance rack), so I bake my shells one at a time.  No problem, I’m retired.  Pan I used is shown photo right. 

Pop the pastry shells (support silicone pans on outer metal pan) into a preheated 350º oven and bake about 15 minutes or just until browning a bit around the edges.  Remove from oven, slightly cool and tip the shells out onto a full-sized baking sheet.  Gently fill each shell with ½ c. of the creamy crawfish casserole mixture.   Set aside while you broil the shrimp.

Turn oven up to broil.  Melt the 3 T. butter in a medium metal baking pan in the oven.  Stir in the Seafood Spice blend.  Next dip each shrimp (both sides) into this seasoned butter and spread evenly in the pan.   Pop into hot broiler and broil shrimp for about 5-7 minutes.   I don’t bother to turn shrimp during cooking.   Watch them closely after 5 minutes to be sure you don’t over brown them, as ovens can vary.  You want them just golden brown as shown above.  Remove pan from broiler and line 5 shrimp atop each pirogue.  Lower oven to 350º and pop the pan back in the oven for about 5-7 minutes just to warm it all up.  Serve at once with a green vegetable or lovely green salad.

NUTRITIONAL INFO:   Makes 4 pirogues, each contains:

679.7 cals, 55.8g fat, 18.1g carbs, 9.9g fiber, 8.25g NET CARBS, 43.5g protein, 936 mg sodium (shrimp & crawfish both have sodium and carbs!)

Crawfish al Pesto on Eggplant “Pillows”

This recipe that I’m quite proud of grew out of a delicious spaghetti squash alfredo dish I created earlier that same year.   I hesitated using crawfish for this, but it turns out that was a good decision.  It came out DELICIOUS! 

I made a batch of my Oven-Fried Fish coating and baked the coated eggplant first, as you would for classic Eggplant Parmigiana.  The crunchy coating on the eggplant very quickly loses its crunchiness, so serve this quickly and don’t hold it over for any reason.  This sinfully rich dish was so good I will definitely be doing it again soon, but perhaps with lobster meat next time.  This dish froze nicely, getting even tastier upon re-baking!  The eggplant will lose that crunchiness from freezing, but the dish still tastes fantastic when reheated.

This recipe is suitable for all phases of Atkins and Keto, and for Primal folks that consume occasional dairy products.  This would not be suitable for Paleo followers.

INGREDIENTS:

12 oz. eggplant, sliced in eight ½” slices

3 oz. plain pork rinds, crushed fine

6 T. homemade mayonnaise

Dash salt

4 T. butter

1 large leek, ends trimmed off, washed well, sliced or chopped into small pieces (about 1½ cups)

¼ recipe Jennifer Eloff’s Condensed Cream of Mushroom Soup

¼ c. Parmesan cheese, grated

1½ T. homemade pesto sauce (or commercial)

8 oz. frozen crawfish tail meat, defrosted (or shrimp)

½ c. heavy cream

½ c. water

1 c. grated mozzarella cheese

2 T. chopped parsley for garnish (optional)

DIRECTIONS:  Preheat oven to 450º.  Lightly oil a baking sheet.  Cut the eggplant into ½” slices.  Baste all surfaces with the mayonnaise using a brush.  Spoon crushed pork rinds over each slice, coating well.  Place the coated slices on the oiled pan and pop into oven, baking at 450º for 20 minutes.

While the eggplant bakes, prepare the topping.  Melt the butter in a large skillet.  Add leeks and saute until tender. Lower heat to medium.  Add the mushroom soup, the Parmesan, crawfish meat, cream and water and simmer over low heat until eggplant is done.  It will thicken as it cooks. Add the pesto and stir.  Be sure to stir the mixture often during cooking so the flavors will blend.

When the eggplant is tender, remove from oven, top each slice with 2 T. of the mozzarella and then spoon 1/8 of the topping (about 1/3 cup) onto each slice of eggplant.  I made the mistake of putting 1 T. under and 1 T. over the topping and popped the pan back into the oven while my garlic toast cooked in the broiler to melt the cheese on top.  But it didn’t completely melt by the time the toast was done.  So in future, I’ll put all 2T. of the cheese underneath the bubbly hot topping so it will melt nicely for me.  Garnish tops with chopped parsley and serve at once.

NUTRITIONAL INFO:    Makes 8 servings, each contains:

355 cals, 30.5 g  fat, 6.06 g  carbs, 1.88 g fiber, 4.18 g  NET CARBS, 14.8 g  protein, 421 mg sodium

Crawfish Pad Thai

I have been intrigued by recipes I see for Pad Thai, although I am very new to it.  Recipes for it would indicate every recipe for it is a little different although some ingredients are consistently in all the recipes, so I went about concocting my own version, pulling from this recipe and that recipe.  I had no idea if the final dish was going to be good.  Told my husband “If we don’t like it, we can just go out and eat.”  It far surpassed our expectations the first time I put this together!  Other than the fact I got it a little too hot with peppers, the overall flavor was truly OUTSTANDING!  I love when I make new culinary discoveries.  I now see why people rant and rave about Pad Thai.  I will definitely be making this dish on a regular basis in future!  I can’t wait to try it with pork, chicken and shrimp one day.

I’m showing a lesser amount of hot pepper ingredients below than went into my dinner tonight 😉 as it was way too hot for as I originally constructed it.  This meal would be suitable for Atkins Induction Phase, Keto diets and would even fit a Primal-Paleo lifestyle if plan-appropriate sauce ingredients are used.

INGREDIENTS: 

3 cloves garlic, minced

3 T. rice vinegar

1 T. oyster sauce

1 T. low-sodium soy sauce

1 drop or pinch of your favorite sweetener (optional)

1 T. fish sauce

2 c. cooked spaghetti squash threads

2 T. olive oil

1 medium carrot, julienned lengthwise and cut into 2″ pieces

2 oz. purple onion

1 small jalapeno, seeded and cut into thin strips

1/8 tsp. crushed red pepper flakes (more if you like things HOTTER!)

1 c. bean sprouts (I had none and used 1/3 c. julienned water chestnuts)

4 large green onions, chopped, ½” pieces

12 oz. cooked crawfish tail meat, (or cooked shrimp)

3 large eggs, beaten

½ c. cilantro, chopped

1 T. butter

DIRECTIONS:  Cook half the spaghetti squash by slicing in half, removing seeds, putting cut side down into baking dish with 1/2″ water and microwaving on HI for 13 minutes.  Holding the squash half with a pot holder or towel, fork out threads from one half of the squash.  Reserve the other half of the squash for some other use.  In a small bowl, make a sauce of the first 6 ingredients.  Set aside.  Melt the butter in a non-stick skillet and scramble the beaten eggs lightly.  Chop with a knife a bit on a cutting board and set aside for now.  Cut up all the vegetables so they are ready for final cooking and assembly.  Heat the oil in a large non-stick skillet.  Add the carrot, purple onion, green onion and sauté until tender crisp.  Add the cooked spaghetti squash threads, the bean sprouts (or water chestnuts) and crawfish tails (or shrimp).  Continue to stir-fry over medium-high heat for about 5 minutes, to allow flavors to blend.  Add the scrambled egg now and then the cilantro, stirring to mix them in evenly.  Lower heat.  Stir the sauce you prepared and pour it evenly over the mixture.  Stir one last time to mix everything thoroughly.  Remove from heat and serve at once.

NUTRITIONAL INFO:  Makes 6 servings, each contains:

178 cals, 9.8 g fat, 8.9 g carbs, 1.9 g fiber, 7 g NET CARBS, 14 g protein, 715 mg sodium

Cajun Crawfish Pies

Man, oh, man, I was in heaven when I made these.   These little gems were one of the very best low-carb kitchen creations of my 14 years of low-carbing!  I’m even going to give this recipe my “mouthgasm” award.  I took my Gluten-Free Grain Free Focaccia Bread recipe and with some considerable effort, used it as a crust to create crawfish pies to rival any I have eaten in Louisiana.  My Mozzy Dough had not yet been developed, so I had to get creative. 

I wantonly admit to scarfing down a lot of these pies in Louisiana on our many visits there.  My filling consisted of basically my crawfish étouffée recipe, a little thickener and my focaccia bread for the crust. I knew as this idea was germinating in my head that  sealing the edges would be tricky and take some ingenuity, as I would be using a thick batter, not a traditional, rollable pie crust.  And IT WORKED for me!  Best of all, the bread dough ended up tasting amazingly like, ummmm…………real PIE CRUST!!!  Even my fussy, non-low-carbing husband said it tasted like piecrust  and gave tonight’s dinner two thumbs up! The ratio of filling to crust was just perfect on these, too!

I have even made this recipe up as mini crawfish pies (makes 30) for a party, but used my Carbalose Pie Crust as it is a dryer dough you can form into the mini crusts.  Here’s what the mini version looks like:  IMG_4973

I can’t tell you how pleased I am with this recipe and thought you’d enjoy listening to the song (one of my Dad’s favorites) that made this Louisiana Cajun delicacy famous to put you in the mood:  http://www.youtube.com/watch?v=xnKOVPXhlnE.  I can even see berry/fruit empanadas on the horizon!  These pies are suitable once you reach Phase 2 nuts & seeds rung of the Atkins OWL carb ladder.   They would not be suitable for Paleo-Primal due to the dairy in the bread.  By the way, I started preparing this meal at 4pm and we were eating it at 5:30!  Longer than most of my recipes, but much faster than I thought it would take to prepare!  

INGREDIENTS: 

4 T. butter

2 oz. onion, chopped

½ c. each green bell pepper and celery, chopped (I used both red and green bell pepper in mine)

¼ c. each green onion and parsley , chopped

6 oz. crawfish tails (I use the frozen and defrost)

2 cloves garlic, minced

½ tsp. my Seafood Spice blend

1/8 tsp. salt

6 drops Tobasco® or other hot sauce

Dash each ground thyme and black pepper

1/3 c. chicken stock (preferably homemade)

¼ tsp. glucomannan powder, xanthan gum or your favorite thickener

1 recipe my Gluten-free Grain-free Focaccia Bread (or my Mozzy Dough you can shape in mini muffin cups)  

DIRECTIONS:  Melt butter in skillet over high heat. Add celery, green pepper and onion.  Add Seafood Spice Blend, salt, pepper and thyme.  Sauté until vegetables are completely tender.  Add Tobasco®.  Add green onion, parsley, garlic and crawfish and stir.  Add glucomannan powder (or your chosen thickener) and chicken stock and stir to blend altogether. Turn fire off.

Preheat oven to 350º.  Make the bread/”pastry” in a medium mixing bowl according to the directions for that recipe.  You need to decide on the shape you want your pies to have (I used a 3 x 6″ oval dish shape, but round or square would work as well) .  I cut parchment paper to fit a large sheet pan.  I inverted my dish on the parchment paper and drew five outlines of the dish with a marker pen, so I could be sure my pies would all be uniform in size and shape.  When the batter is ready, scoop up exactly 3 T. onto each drawn outline on your parchment.  Then, using a fork, very gently spread the batter out thinly to within ¼” of the outlines you drew (you don’t want the batter to touch the ink).  It will be thin, but should go nearly to the edges with effort.  Pop the pan into your 350º oven and bake just 10 minutes.  Remove from oven and increase oven temp to 375º.

Using a spoon, section off the seafood filling in your skillet into 5 equal portions and spoon 1/5 of the filling onto each of the baked bottom “crusts”.     Spread the filling evenly to within ¼” of the edge of the bottom crust. The filling should be slightly mounded in the center.  Again using a spoon, make 5 equal portions of the remaining batter in your bowl.  Here’s where it gets a little tricky.  I spooned one of the marked off portions of batter into one hand and using my fork, dotted the batter evenly over the top and sides of the pile of seafood filling, using the fork then to try to blend those tiny dots into a contiguous top “crust”.  It didn’t cover perfectly, but I was able to create a respectable top crust on each pie.  During the baking the top crust slightly spreads out to fill in most of those little gaps in the batter.

Pop the pan into  a now 375º oven and bake for 10-12 minutes or until lightly browned on top.  Serve at once with a nice green salad or perhaps your favorite green veggie. I hope you enjoy these as much as we did!

NUTRITIONAL INFO:   Makes 5 large pies, each contains:

395 cals, 30.5 g fat, 8.62g carbs, 3.64g fiber, 4.98g NET CARBS, 24.6g protein, 471 mg sodium

Makes about 30 mini crawfish pies for party food, containing around 1.0 net carb per bite-size pie (with no top crust used)

Crawfish Dumpling Stew

Moving along in our food journey, I was thinking about how much I miss the seafood we could get the 30+ years we lived on the Texas Gulf Coast.  So I thought I’d post some of my favorite seafood recipes this week.  Man, I had the very best at my fingertips down on the coast.  Why ever did we move (hurricanes, that’s why)?  Moving up to Central Texas to get away from them when we retired, I’m relegated to using frozen crawfish, previously-frozen shrimp, not-too-good crab meat and just awful 1-2 day old whole fish (trucked in from the coast) unless you go fishing yourself and catch something worth cooking. 

I number of years ago I found a fantastic way to shake up my glucomannan dumplings recipe with crawfish! I hesitated to actually make it for the longest time, as I was afraid putting that much bulk into my dumpling batter would make them just totally fall apart in the simmering water.  As you can see in the pic, that just didn’t happen! 

This is 5-star restaurant eating experience as far as I’m concerned!  Not many recipes strike me that way, either.  It was every bit as good as the seafood fare served to me in the finest restaurants in Dallas or Houston, that’s for sure!  My husband and I were absolutely astounded at how good this idea I hatched one night would come out.    This opens the door for a world of new uses for this dumpling recipe.  

For those still on Atkins Induction, omit the wine and substitute 1/2 c. seafood stock or chicken stock in your sauce.  This recipe is suitable for Atkins OWL Phase 2 or beyond and Keto diets if it fits your daily carb limits.  You’d have to make the sauce with coconut milk for it to pass Primal-Paleo muster, but that would taste OK here.  By the way, these freeze beautifully and tasted even better than the first night they were made!  🙂

VARIATIONS:  Substitute either crab meat or shrimp for the crawfish.  These made smaller would also be lovely in a simple wonton-style soup, standing in for the meat-filled wontons.  🙂

DUMPLING INGREDIENTS:

6 oz. cooked, cleaned crawfish tail meat (the rest of the 12-oz. package goes in the sauce)

4 T. butter, unsalted

2 oz. celery, chopped

2 oz. green bell pepper, chopped

2 oz. yellow onion, chopped

½ c. green onion, chopped

1/3 c. parsley, chopped (3 more T. needed for the sauce, so go on and chop 1/2 c. total 😉 )

1 clove garlic, minced

1 tsp. my Seafood Spice Blend

2 recipes my glucomannan Dumplings batter


SAUCE INGREDIENTS:

4 T. unsalted butter, melted

6 oz. remaining crawfish

½ c. white wine (omit for Induction)

1 T. lemon juice

3 T. parsley, chopped

½ c. heavy cream

½ c. water

1 small clove garlic, minced

Dash each salt and black pepper

DIRECTIONS:  Chop all the vegetables up.  Melt 4 T. butter over high heat and add the celery, bell pepper, onion and minced garlic.  Sauté until they are tender.  Add 6 oz. of the crawfish, the parsley, and seafood spice mix.  Lower heat and let simmer 2-3 minutes for flavors to blend.  Turn off heat.

Bring a large stew pot of water to a boil.  While it is heating, make up a double recipe of my glucomannan dumpling batter and add the veggie crawfish mixture to the egg/water mixture and stir well. Stir the dry ingredients in and mix with a rubber spatula until it begins to thicken up.  Keep turning the dough until it is stiff enough to roll.  Roll 24 1″ dumpling in your palms and set on a sheet of silicone (best) or a baking sheet.  When all 24 are formed, your water should be at a rolling boil.  Drop all 24 dumplings gently into the water.  This will cool the water down a bit. You want a medium gentle rolling water bath.  Cover and cook for exactly 10 minutes without lifting the lid.

Make the sauce while the dumplings are cooking.  Melt 4 T. butter over medium heat in a skillet.  Add the remaining 6 oz. crawfish, garlic, wine, lemon juice parsley and simmer long enough to cook the garlic well. Add the cream and salt and pepper to taste.

When dumplings have cooked 10 minutes, lift lid and using a slotted spoon or tongs, gently lift onto a serving platter and spoon the sauce around them.  I served with steamed, buttered broccoli, but they would be good with a nice green salad and low-carb dinner rolls.

NUTRITIONAL INFO:   Makes 6 servings of 4 dumplings each and ¼ c. sauce.  Each contains:

258 cals, 20.4g fat, 10.55g carbs, 5.96g fiber, 4.59g NET CARBS, 13.25g protein, 481 g  sodium


Chipotle-Lime “Sweet Potatoes”

I clipped a recipe out of the Houston Post many years ago, but I have low-carbed it using pumpkin and subbing in maple extract for the brown sugar in the original recipe, so that I can now have these as often as I wish.  I was not very fond of sweet potatoes when I was growing up.  Everyone puts orange juice and orange peel in them and I just didn’t like that flavor combination much.  I ate them only baked into pies, cakes and muffins.  But ever since finding this particular recipe, I just love them and can’t get enough of these!  I bake this recipe OFTEN, and with a wide variety of meats and seafood!

This is NOT your granny’s sweet potatoes!  Chipotle peppers are highly smoked jalapenos and taste nothing like green jalapeno peppers, in my opinion.  They, in combination with the lime zest, add a most unique “twist” to the ever-popular vegetable during the holidays. 

My brother was an Executive Chef at one time and just raved about this dish when I served it to him!  He went on to serve it often to his own dinner guests in Seattle, where he lived, saying he always got the same reaction about this dish.  FANTASTIC!  It has become tradition in our house at the holidays when fresh pumpkin is so plentiful.  When I can’t get fresh pumpkin, I have been known to use butternut squash in this recipe in a pinch, but in all honesty, it’s not quite as good.  This recipe does not work well with acorn squash, as I tried that one time and didn’t care for it at all.

I find this dish is particularly tasty with baked, fried or grilled seafood, grilled meat, especially wild game, Texas BBQ and of course that Christmas or Thanksgiving turkey or ham.  The flavor combination of lime, smoky chipotles and maple extract (¼ c. very high carb packed brown sugar in the original recipe) is a real winner!  To make this dish Atkins Induction acceptable, I have substituted 100% fresh cooked pumpkin flesh for the sweet potatoes.  Could hardly tell a difference, other than the color is more golden than orange, thus the addition of red food coloring to correct color aesthetics.  Absolutely DO NOT SUBSTITUTE CANNED PUMPKIN or you are going to be extremely disappointed.  Just not the same dish.  Once you reach the starchy veggie rung of OWL and can afford a few more carbs,  I would recommend using just 1½ lb. pumpkin and adding 1 lb. cooked, mashed sweet potato (2 medium) for both flavor, color and a much creamier texture.  You will of course need to adjust nutritional info if you make that change as my numbers are for pumpkin only.

This dish does not freeze well with pumpkin in it (the original with real sweet potatoes froze very nicely).  As a matter of fact, in my opinion, pumpkin flesh does not freeze well in many dishes, as its water separates out in the bottom of your baking pan upon thawing.  That can really ruin the texture and appearance of some dishes for me.  No matter if you try to drain that water off, it just seems to keep bleeding out more water!  Totally spoils it for me, so I never freeze pumpkin, EVER. Pumpkin baked goods, on the other hand, freeze beautifully.  Go figure!

This recipe appears in Vol. 1 of Jennifer Eloff’s latest cookbook series, LOW CARBING AMONG FRIENDS.   I hope you’ll click the link to their Facebook page and take a look at a sampling of the recipes that await you in these cookbooks.  Any hostess would be proud to serve the recipes shared by these very talented chefs…..some of the best on the web, including George Stella!  You can order the entire set or individual volumes at Amazon or here:  http://amongfriends.us/order.php

INGREDIENTS:

2½ lb. cooked fresh pumpkin (DO NOT USE CANNED PUMPKIN)

½ c. heavy cream

4 T. butter

¼ tsp. salt

2 T. fresh lime juice

zest of 1 large lime (2 if they are small)

½ c. granular Splenda

1 tsp. maple extract (or 2 T. sugar-free maple syrup)

1 tsp. cinnamon

1-2 chipotle peppers (canned, in adobo sauce) seeded, rinsed & chopped

few drops red food coloring to achieve orange color of sweet potatoes (optional)

DIRECTIONS:  Remove stem and cut a small 4-4½ lb. pumpkin in half.  Remove seeds (you can roast them for snacks) and turn cut side down into baking pan.  Fill pan with 1″ water and bake pumpkin at 350º until tender when fork is stuck into it (about 45 minutes).  Remove and cool enough to handle.  Scoop/scrape  the pumpkin flesh out of skin/shell and weigh. Should yield about 2-2½ lb. flesh.  (freeze any overage for future use).  Whip pumpkin with electric mixer or food processor to get it as smooth as possible.  Add all remaining ingredients except chipotle peppers. For the holidays or very special occasions, I will bake 2 medium sweet potatoes, scoop out flesh, mash and add also for richer flavor, but I don’t do this for everyday consumption as it ups the carbs.  I have not included the sweet potatoes in the numbers below.

These little chipotle peppers (smoked jalapenos) are very HOT, so special handling is recommended.  Either wear plastic gloves (homemade  “sandwich bag gloves” will do) or be sure you wash your hands well after handling.  Take 1 chipotle pepper (about 1½” long) out of the can.  Rinse, and remove seeds and ribs with a knife.  Finely mash/chop the pepper almost into a puree on a flat wooden board.  Add to pumpkin mixture, stir well and taste to see if this is hot enough for you.  You don’t want to get this dish too hot, but a little tingle on the tongue is what you’re looking for.

If you want even more smoky taste or a hotter dish, carefully repeat, adding only ½ pepper at a time, re-tasting after each addition.   If you add pepper in stages like this, you won’t ever ruin the whole batch getting it too hot (I did one time).  Never forget that not everyone at your dinner table or social occasion will like things as hot/spicy as you may.

Stir well and pour into buttered ceramic/glass baking dish.  Sprinkle with a dash more cinnamon and bake at 350º for 20-30 minutes.

NUTRITIONAL INFO:  8 Servings, each contains: (does not include sweet potatoes added on special occasions)

114 cals, 7.6g fat. 12g carbs, 4g fiber, 8g net carbs, 2 g  protein, 121 mg. sodium

Cran-Orange Acorn Squash

I’m trying to use just fresh fruit for the occasional sweets craving.   I’ve never been a big sweets eater, so this works just fine for me.  I like to bake an acorn squash from time to time, especially at the holidays, both as a side dish and as a dessert.  It goes so well with pork and roast turkey.  Including holiday flavors like cranberries and orange, seems like you can’t go wrong. 

I traditionally used maple syrup or brown sugar in this recipe, but maple extract can fill that brown sugar taste.  Splenda or Stevia will have to do to sweeten up the squash a bit.  This is a pretty high-carb vegetable, so it should not be enjoyed until Atkins Pre-maintenance or Maintenance phases.  It is also suitable for Paleo-Primal dining.  This was lovely with pork!  This is also very good with a holiday turkey or wild game.

INGREDIENTS:

1   5″ diameter acorn squash

½  naval orange, peeled and chopped

1/3 c. fresh cranberries, chopped

½ tsp. cinnamon

Sweetener of your choice (I used liquid stevia extract)

¼-½ tsp. maple extract

4 tsp. unsalted butter or ghee

VARIATION:    Sprinkle on a few chopped pecans before baking.  

DIRECTIONS:   Preheat oven to 350º.  Using a large knife, cut the squash in half.  Scoop out and discard seeds. Place a little water (1/4″) in a shallow quiche dish.    Place squash cut side down in the water and microwave on HI for about 8-10 minutes or until it is beginning to get tender inside but is not falling-apart mushy.  Remove from oven and drain off water.  Turn squash cut side up and set aside while you make the filling.  In a small bowl, place the chopped orange, chopped cranberries, cinnamon and if using, the sweetener and maple extract.  Stir well.  Fill each squash cavity with half the mixture.  Top with 2 tsp. butter/ghee each and bake in preheated 350º oven for about 20 minutes.  

NUTRITIONAL INFO:   Makes 2 servings, each contains: (not including any nuts used on top)

188 cals, 8.4g fat, 30.7g carbs, 5.8g fiber, 24.9g NET CARBS, 2.3g protein, 8 mg sodium

Ham & Veggie Terrine

I include this terrine with my vegetable extravaganza, but I did add ham to this dish, making it a complete meal.  Omit the ham for a veggie side dish.  These are kind of fun to make and so pretty and colorful! 

I don’t own a ceramic loaf pan anymore, so I just use my metal 8″x4″ loaf pan lined with parchment to make my terrines.  This dish is delicious, not to mention nutritious with all those veggies.  A quick cutting of the vegetables, a brief sauté, fill the mold and it’s in the oven in no time!  You could serve this tasty dish for breakfast, brunch gatherings, lunch or dinner.  This recipe is suitable for all phases of Atkins and other Keto diets.  Paleo and Primal followers will want to sub in coconut milk for the cream here.  Omit the ham and you vegetarians can even enjoy this one!

INGREDIENTS:

1 large carrot, peeled, sliced thin

2 5″ zucchini (about 10 oz.), sliced thin

1 leek, washed well of dirt and sliced thin

3 T. olive oil

Dash sea salt and coarse black pepper

¼ tsp. garlic powder or 1 small clove garlic, minced

4 extra large eggs, beaten (or 5 large eggs)

2 T. coconut flour

3 T. oz. heavy cream, divided

5 T. water, total

1½ c. cooked, cured ham (omit for a vegetarian version)

VARIATION:  Substitute cooked bacon for the ham

CHEESE SAUCE:  5-10 minutes before terrine is done, mix 3 T. of the water, 2 T. of the cream in small saucepan set into larger saucepan (or use double boiler) and heat.  Add 4 slices American Deluxe or Cheddar Cheese.  Stir and blend until cheese is melted and all is incorporated into a smooth sauce.  Pour into serving bowl when terrine is out of oven, sliced and ready to serve.  Sauce will thicken fast, so do not dip it up one minutes before you need it.

DIRECTIONS:  Preheat oven to 350º.  Line a metal or ceramic 4×8″ loaf pan with parchment.  I don’t line the ends of the pan and just oil there lightly.  Set aside for now.  Stem and slice up all veggies.  I used a food processor for uniform, thin slice. Heat olive oil in wok or large skillet.  Add veggies, salt, pepper and garlic powder. Sauté stirring often over medium-high heat until veggies are tender but not mushy.  Stir in sliced/diced ham.  Turn off heat.

In a small bowl, beat the eggs, remaining 1 T. cream and remaining 2 T. water until smooth.  Add coconut flour.  Stir again.  Pour over veggies and stir well to blend.  With rubber spatula, scrape mixture into parchment-prepared pan.  Trim off excess paper above top of pan but leave a bit for “handles”. Pop into 350º oven for about 40 minutes.  Check at 30 min. as ovens do vary.  Top will be lightly golden and center should be firm (not damp) when touched.  Do not over brown as terrine will be dry if overcooked.  Remove from oven, run knife along ends of pan and lift out  of pan holding the paper, tipping onto your platter.  Slice into 6 slices (about 1″-1¼” thick).  Serve with cheese sauce (or some other favorite sauce if you prefer)

NUTRITIONAL INFO:   Makes 6 servings, each contains (including 1½ T. sauce):

288 cals, 21 g fat, 6.88g carbs, 1.48g fiber, 5.4g NET CARBS, 18.6g protein, 689mg sodium

Green Bean Casserole

Green Bean Casserole

This is as close to the classic, ever-popular holiday green bean casserole as I’ve been able to achieve as a low-carb alternative.  My husband liked it so much, he said “This one is your best version of this to date!” and dipped up seconds.   So I’ll be making this version from now on, it would appear.

I owe many thanks to Jennifer Eloff for her inspirational recipe:  Casserole Topping, to which I made a few additions.  I finally got around to trying it, Jen, and it really does work with cheese and bake mix!  I had visions of it sinking down into the bean mixture during baking, but it didn’t sink at all!  I added even more crunch with the addition of crushed pork rinds, which I couldn’t taste as such in the final dish.  🙂

I also used her Condensed Cream of Mushroom Soup for this dish, which I adore for so many things.  If you haven’t tried it yet, you simply MUST!    This delicious recipe is not suitable until you have gotten to Atkins Pre-Maintenance or Maintenance because of the grain in the bake mix.  Sub in coconut flour in the mix if you avoid grains.

INGREDIENTS:

3 c. frozen green beans, regular or French style

½ recipe Jennifer Eloff’s low-carb  Condensed Cream of Mushroom Soup

1  can (6-oz.) sliced mushrooms, drained (about ½ c.)

Dab olive oil to grease dish

1 recipe crumble topping (see below)

CRUMBLE TOPPING:

½ c. shredded Monterrey Jack cheese

1/3 c. Jennifer Eloff’s Splendid Low Carb Bake Mix

2 T. cold unsalted butter

10 medium pork rinds

1 T. toasted, dehydrated (or fresh) shallots (or red onion)

¼ tsp. my Cajun Seafood Spice Blend

1 T. hemp hearts (optional, adds a nutty flavor)

DIRECTIONS: Lightly oil a 2-qt. baking dish.  Preheat oven to 350º.  Place defrosted beans (uncooked), soup and mushrooms in a large bowl and toss well to coat.  Scrape the mixture into your lightly oiled baking dish.

To make topping, toss all ingredients but shallots or red onion into a food processor or blender and pulse a few times to make a crumbly mixture.  Sprinkle topping over the green bean mixture.  Sprinkle over shallots/onion and pop into 350º oven for about 20 minutes for French-style beans, 30 minutes for regular cut beans until golden brown on top.  Serve at once.

NUTRITIONAL INFO:  Makes 5 servings, each contains:

237 cals, 18.3g fat, 9.52g carbs, 3.32g fiber, 6.2g NET CARBS, 10.3g protein, 294 mg sodium

Baked Sweet Potato Halves

Another holiday treat at my house.  My mom just loved baked sweet potatoes with nothing but butter on them.  Me, I like to dress them up with a hint of cinnamon and brown ‘sugar’ flavor.  So I have blended her favorite way to cook them along with mine for this creation.  This method of preparation is effortless, fast and you can make a lot of them for a crowd at one time using a larger baking pan!   I just love to have any leftover halves for breakfast the next day, dotted with more butter and cinnamon. 🙂  Shown above with pork chop and delicious kale with bacon.  But tonight, I’m serving these potatoes with some baked ham leftover from the holidays.

Now sweet potatoes aren’t something a low-carber should be eating daily, mind you, but I have a couple left in the house from the Holidays, so I’m springing for higher carbs to finish them off.  Sweet potatoes are so nutritious and have a fiber deduction on the carb count as well, something white potatoes can’t boast about.  These are not suitable until you are in Pre-Maintenance or have reached goal weight.  Added note:  these are wonderful with baked fish, shrimp, pork, ham, BBQ beef or JUST BY THEMSELVES!

INGREDIENTS:  

1    medium 6-oz sweet potato, washed

2 T. melted butter

1/8-¼ tsp. cinnamon (I use Vietnamese cinnamon from Penzey’s)

OPTIONAL:  few drops maple extract stirred into the melted butter for brown sugar flavor

DIRECTIONS:  Wash potato and cut tips off each end.  Cut in half lengthwise.  Turn oven on to 400º.  Melt the butter in pan as the oven preheats, right in your metal baking pan. Remove pan from oven and stir in the cinnamon and maple extract.   Now rub the cut side of the potato in the cinnamon-y butter.  With cut side of the potatoes still down, place pan back in oven and bake at 400º for about 30 minutes (longer for larger potatoes).  When a knife tip can be inserted easily, they are done.  Remove, serve and enjoy!

NUTRITIONAL INFO:  Makes 2 servings, each contains:

175 calories, 11.5 g  fat, 17.35 g carbs, 2.7 g fiber, 14.6 g  NET CARBS, 1.54 g  protein, 48 mg sodium

Smoked Gouda Cauliflower

I thought I’d focus on holiday vegetable recipes today to wrap up my “it’s-not-a-boring-diet ” recipe extravaganza.  This recipe has proven to be one of the most popular ones on my website.  It was a real hit with my brother, at one time an executive chef at Top-of-the-Mark in San Francisco.  My husband just loves it!  It also has hundreds of thousands of fans on Facebook (I used to post there) so I thought I should definitely include it today.  It’s one of my all-time favorite cauliflower creation! 

Smoked Gouda doesn’t melt in dry heat easily, but if shredded, it usually melts acceptable when surrounded by moist heat, above and below.  In this dish, it takes an ordinary cheesy cauliflower casserole and transforms it into the sublime.  The Smoked Gouda truly sets this one apart from all the other cauliflower casseroles you have tasted.  It’s Atkins Induction friendly, too! 

I buy my Smoked Gouda at Sam’s Club and have discovered, not all stores carry quality Smoked Gouda.  The brand I bought in San Antonio at my mother’s grocery store was just awful….totally tasteless. This recipe appears in Volume 1 of Low Carbing Among Friends by best-selling author Jennifer Eloff and other talented chefs, including George Stella!  There are 5 volumes already released and two more due out soon!  More info on their Facebook page linked above.   You can order our cookbooks here or at Amazon.com.  These cookbooks are filled with easy, gluten-free, tasty low-carb creations by a group of very creative cooks. You’re going to WANT your very own set of these cookbooks, folks.  They are currently on sale at the lowest price ever, so get yours TODAY!

INGREDIENTS: 1 medium-large head cauliflower

6 oz. cream cheese, softened

4 oz. smoked Gouda cheese, grated or shredded

¼ tsp. coarse black pepper

chopped chives or green onion to garnish

DIRECTIONS: Cut up cauliflower into manageable pieces and boil or steam until tender.  Drain off any water and mash the chunks up slightly with a fork (do not puree, however).   Stir in softened cream cheese until it is melted and blended well.  Grease glass casserole dish and spoon half the cauliflower mixture in.  Sprinkle with half the grated smoked Gouda (I do not recommend using slices for this.  Grate it to facilitate melting).  Spoon remaining cauliflower into dish and top with rest of Gouda cheese.   Sprinkle with just a dash of salt and pepper if desired, but cheese has a lot of sodium.  If you are sodium sensitive, I wouldn’t add ANY salt.   Sometimes I add some chopped chives or green onion to the top, but this is not in the nutritional info below.  Bake at 350º for 20-30 minutes or until bubbly.

NUTRITIONAL INFO: Serves 6, each serving contains:  (you may get 8 servings, lowering carbs even more)

190 cals, 15.22g fat, 6.17g carbs, 2.4g fiber, 3.77g NET CARBS, 8.77g protein, 312 mg  sodium

Twice-Baked Portobello Mushrooms

I’m going to make these again as soon as I can get some more Portobellos.  These are yummy beyond words with grilled steaks.  We just love them!  So glad I tried this veggie combo so I can feel like I’m eating “high on the hog” as my Dad loved to say.  Of course, you can cook homemade mashed cauliflower, but the Birdseye frozen cauliflower rice is so good, and so convenient, why would you bother?  😉  This side dish is suitable for all stages of Atkins, Keto plans, Paleo and Primal as well.

INGREDIENTS:

3  Portobello mushrooms (around 3-oz. each)

3 T. olive oil

12 oz. pkg. frozen Mashed Cauliflower (Birdseye or homemade)

1 T. unsalted butter

¼ c. green onion or chives, chopped

¼ c. Cheddar Cheese shreds

DIRECTIONS:  Preheat oven to 350º.  Line a baking sheet pan with parchment.  Using a spoon, scoop out and discard the dark gills out of the mushrooms.  With a basting brush, lightly cot both sides of the mushrooms with olive oil.  Set them curve side down on the pan.  Pop them in oven for about 8-9 minutes.

While they are pre-cooking, cook the cauli-mash as instructed on the packaging.  I microwaved mine.  Remove film from tray and stir in the butter to mix and melt.  Remove mushroom pan from oven and spoon 1/3 of the mixture into each of the 3 mushrooms.  Top each with 1/3 of the Cheddar cheese shreds.  Finally, sprinkle the green onion or chives evenly on all 3 servings.  Return the mushroom pan to the oven and bake about 10 minutes, just until cheese is melted.

NUTRITIONAL INFO:   Makes 3 servings, each contains:

297 cals, 22.3g fat, 7.06g carbs, 2.33g fiber, 4.73g NET CARBS, 4.6g. protein, 261 mg sodium

Spinach Parmesan Bake

This has been a very popular side dish on my recipe blog.  Once you taste it, you’ll see why.  Facebook shares were amazing on this recipe.  This dish is simple to make and I’m very please with the resulting flavor profile.  The concept came to me one night when I thought about making a spinach soufflé, but wanted something a little denser and cheesier. 

This pairs nicely with roast pork and was delicious with our rosemary-onion pork steaks the night I created it.  I did put 3 large sliced mushrooms in this, but they added absolutely nothing to the flavor impact.  I won’t bother to include them again and I’m not including those in my recipe here.  This dish is Atkins  Induction suitable.  

INGREDIENTS:

2 T. olive oil

2 oz. onion, chopped

Dash salt

10 oz. box frozen spinach, thawed and drained

2 oz. cream cheese

2 oz. heavy cream

1/3 c. homemade mayonnaise

2 large eggs

3/4 c. grated Parmesan cheese

With Chicken Added for a meal!

VARIATION:   Add 2 c. chopped raw, boneless chicken meat to the skillet with the onion and turn this side dish into a delicious meal.

DIRECTIONS:  Preheat oven to 350º.  Heat olive oil in non-stick skillet over med-high heat.  Add onion and salt and sauté the onion until tender.  Add the drained spinach and cook a few minutes, stirring several times.  Lower heat to medium.  Cut the cream cheese into little chunks and melt and stir it into the warm spinach.  Add mayonnaise and stir well.  Turn off heat.  Beat the eggs in a bowl with the cream and pour it evenly over the top of the spinach.  Top with Parmesan and bake for 20-25 minutes at 350º.

NUTRITIONAL INFO:  Makes 4 servings, each contains:

420 calories, 38 g  fat, 6.78 g  carbs, 2.75 g  fiber, 4.03 NET CARBS, 15.28 g  protein, 622 mg sodium

Spaghetti Squash Parmesan with Bacon

This side dish is simply delicious, considering how little is in it!  The bacon and onion really GO together in this one!  It’s so good it had over 200,000 Facebook fans over time back in the day I posted there.  If you don’t overcook the squash and are careful when removing the threads, you can serve this right in the shell for its own “bowl” for festive occasions!   One reader suggests roasting the squash traditionally in the oven for added flavor if you have the time.  This one is definitely a must try.  This is suitable for all phases of Atkins and other Keto diets.

INGREDIENTS:

½ large spaghetti squash (yields about 4-5 c.)

4 slices bacon, chopped fine

3 oz. chopped onion

1/3 c. grated Parmesan cheese

Dash salt

¼ tsp. pepper

DIRECTIONS:  Cut a large spaghetti squash in half.  Remove seeds with a spoon and discard them. Place one half of the squash face down in glass baking dish, reserving the second half for some other use.  Surround with with ½” water and microwave 13-15 minutes.  Drain off water, invert, remove/discard seeds (or feed to the birds in your yard 🙂 ) and fork out the threads into the same dish.  If you prefer to roast your squash:  after you cut and seed the squash, add 2 cups water (1/2 inch deep) to a ceramic casserole dish; add squash face up and place in a 375º F oven for 45 minutes.  Then cover for 10 minutes with foil.  Fork out the threads onto a plate. Meanwhile, in a non-stick skillet, brown bacon bits and onion until bacon is done and onion is tender.   Sprinkle salt, pepper and Parmesan on top of squash.  Then spoon into the empty squash shell.  Spread onion/bacon mixture evenly on top.  Microwave 5 minutes on high, or bake in oven at 350º for 20 more minutes.

NUTRITIONAL INFORMATION: Makes 4 servings each containing:

107 cals, 6.7 g fat, 4.8 g carbs, 0.8 g fiber, 4 g NET CARBS, 7.1 g protein, 429 mg sodium

Twice-Baked “Potatoes”

I have made this delicious side dish probably hundreds of times throughout my 14 years of low-carbing.  I can make them blind-folded now, no recipe in front of me needed.  You just can’t beat an all-time favorite food!  Comfort food for sure at our house.  This dish is suitable for all phases of Atkins and Keto diets.  It is not suitable for Primal-Paleo due to all the dairy.

INGREDIENTS:

24 oz. raw cauliflower (about 2/3 of a large head)

1 oz. heavy cream

1 oz. cream cheese

1 oz. sour cream

4 T. melted butter, unsalted

4 oz. Cheddar cheese, shredded

2 large green onions, chopped

1 tsp. or less olive oil to grease dish

VARIATION:   Use American Deluxe cheese instead of Cheddar.

DIRECTIONS:  Cut cauliflower into smaller pieces and boil or steam until tender.  Drain well.  Stir in the cream cheese and butter to melt.  Add the sour cream and heavy cream and whip with a stick blender or hand mixer until smooth or nearly smooth.  Spread into a greased medium baking dish and top with half the cheese, then the onions and finally the rest of the cheese.  Bake in a preheated 350º oven for about 20 minutes or until lightly browned on top.

NUTRITIONAL INFO:  Makes 6 servings, each contains:

209 cals, 18 g  fat, 7.85 g  carbs, 2.98 g fiber, 4.87 g NET CARBS, 6.98 g protein, 257 mg sodium

Loaded “Potato” Casserole

Who doesn’t like a loaded baked potato?  This is the low-carber’s version, shown above, with meat added for a complete meal!  Just leave out the meat and you have loaded baked “potatoes.”  Not such a pretty dish photographically,  but a very tasty one we all love dearly!   I had a leek on hand so I just used that, but green onion is more traditional on a loaded baked potato.  This goes together fast and is truly delicious.  Makes a big casserole that will serve 6 hungry adults.  🙂  This dish is suitable for all phases of Atkins, Keto diets and those Primal folks that eat occasional dairy.

INGREDIENTS:

½ large head cauliflower, cut into smallish chunks

4 oz. bacon,  chopped

1½ c. green onion or cleaned leeks, chopped

1 lb. ground beef or pork (I use 90%),

2 oz. cream cheese

½ c. sour cream

1/8 tsp. coarse black pepper

2 c. shredded cheddar cheese

VARIATION:   Omit the ground beef for a simple side dish for other meat entrées

DIRECTIONS:  Preheat oven to 350º.  Steam or boil cauliflower until almost fully tender, but not quite.  While the cauliflower is cooking, in a large skillet or wok, brown the bacon.  Add the green onion or leeks and sauté until tender. Add black pepper and mix in well.  Salt won’t be needed with bacon and this much cheese. 🙂  Add ground beef, breaking apart and stirring as it cooks.  If using fattier ground beef, I recommend browning it first and draining off the excess grease before adding the bacon and other ingredients to the skillet.  This will result in a less greasy final dish.

Now add cream cheese to the skillet, stirring to allow it to melt and disperse evenly into the mixture.  Add sour cream and blend well.  Stir in the drained cauliflower gently. Top with grated cheese and pop into preheated 350º oven for 20-30 minutes to allow flavors to blend and cheese to melt.  Serve at once with a lovely green salad or green veggie of your choice.

NUTRITIONAL INFO:   Makes 6 servings, each contains:

465 cals, 37g fat, 8.68g carbs, 2.41g fiber, 6.27g NET CARBS, 26.6g protein, 676 mg sodium